Hyperview Navigation
The team has been hard at work updating Hyperview with support for navigation based on React Navigation. Our goal was to create a declarative syntax in HXML that would instruct Hyperview how to build navigation hierarchies. This document will serve as a guide to using dynamic navigation in your projects. These features are available starting in Hyperview version 0.68.0.
Navigators
A navigator is an entity which provides a navigation state along with functionality to allow a user to switch between different routes (screens) within the navigator.
Navigators are represented in HXML with the <navigator> element and contain the following attributes:
- id: the unique identifier for this navigator.
- type: the type of navigator to use, either stack or tab.
- merge: an optional boolean controlling state updates when new structures are received.
When constructing HXML navigation documents, the <navigator> elements must always be the child of either a <doc> element or a <nav-route>. Only one <navigator> element can exist at any level of the structure. Each <navigator> must contain at least one <nav-route> child.
Routes are represented with the <nav-route> element and contain the following attributes:
- id: the unique identifier for this route.
- href: an optional designation of the url to load when the route is focused. A <nav-route> must contain either an href attribute with non-empty value or a child <navigator> element. See Nested navigators section for more information.
- selected: an optional assignment of the initial selection state (tab navigator only). When no route is marked as selected, the first route will be selected by default.
- modal: an optional assignment of the route presentation as a modal (stack navigator only). When set to true, the route will use modal presentation, when false (default), the card presentation will be used.
Only one route is focused at a time. In a tab navigator, this will be the selected tab. In a stack navigator, it will be the most recently added route. The contents of a route are only loaded when the route has focus.
Tab navigator
The following example demonstrates how to define instances of tab navigators in a document.
<doc xmlns="https://hyperview.org/hyperview">
  <navigator id="root" type="tab">
    <nav-route id="home" href="http://myapp.com/home.xml" />
    <nav-route id="profile" href="http://myapp.com/profile.xml" />
    <nav-route id="feed" href="http://myapp.com/feed.xml" />
  </navigator>
</doc>
Example 1: Example HXML to create a tab navigator.
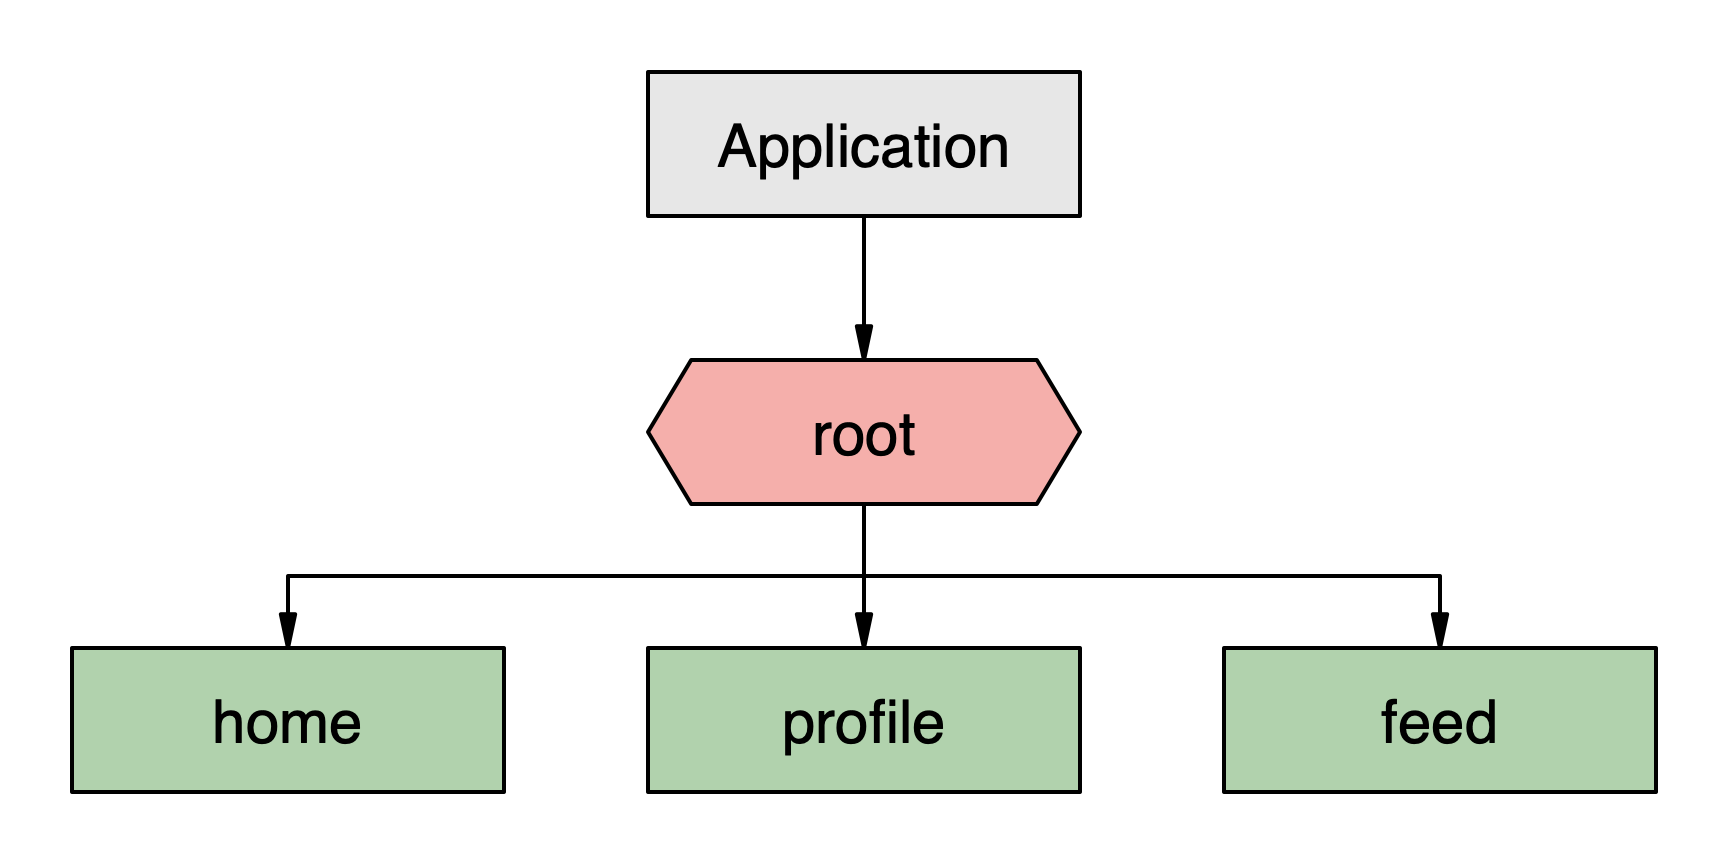
Diagram 1: Visualization of a simple tab navigator.
Stack navigator
The following example demonstrates how to define instances of stack navigators in a document.
<doc xmlns="https://hyperview.org/hyperview">
  <navigator id="root" type="stack">
    <nav-route id="home" href="http://myapp.com/home.xml" />
  </navigator>
</doc>
Example 2: Example HXML to create a stack navigator.
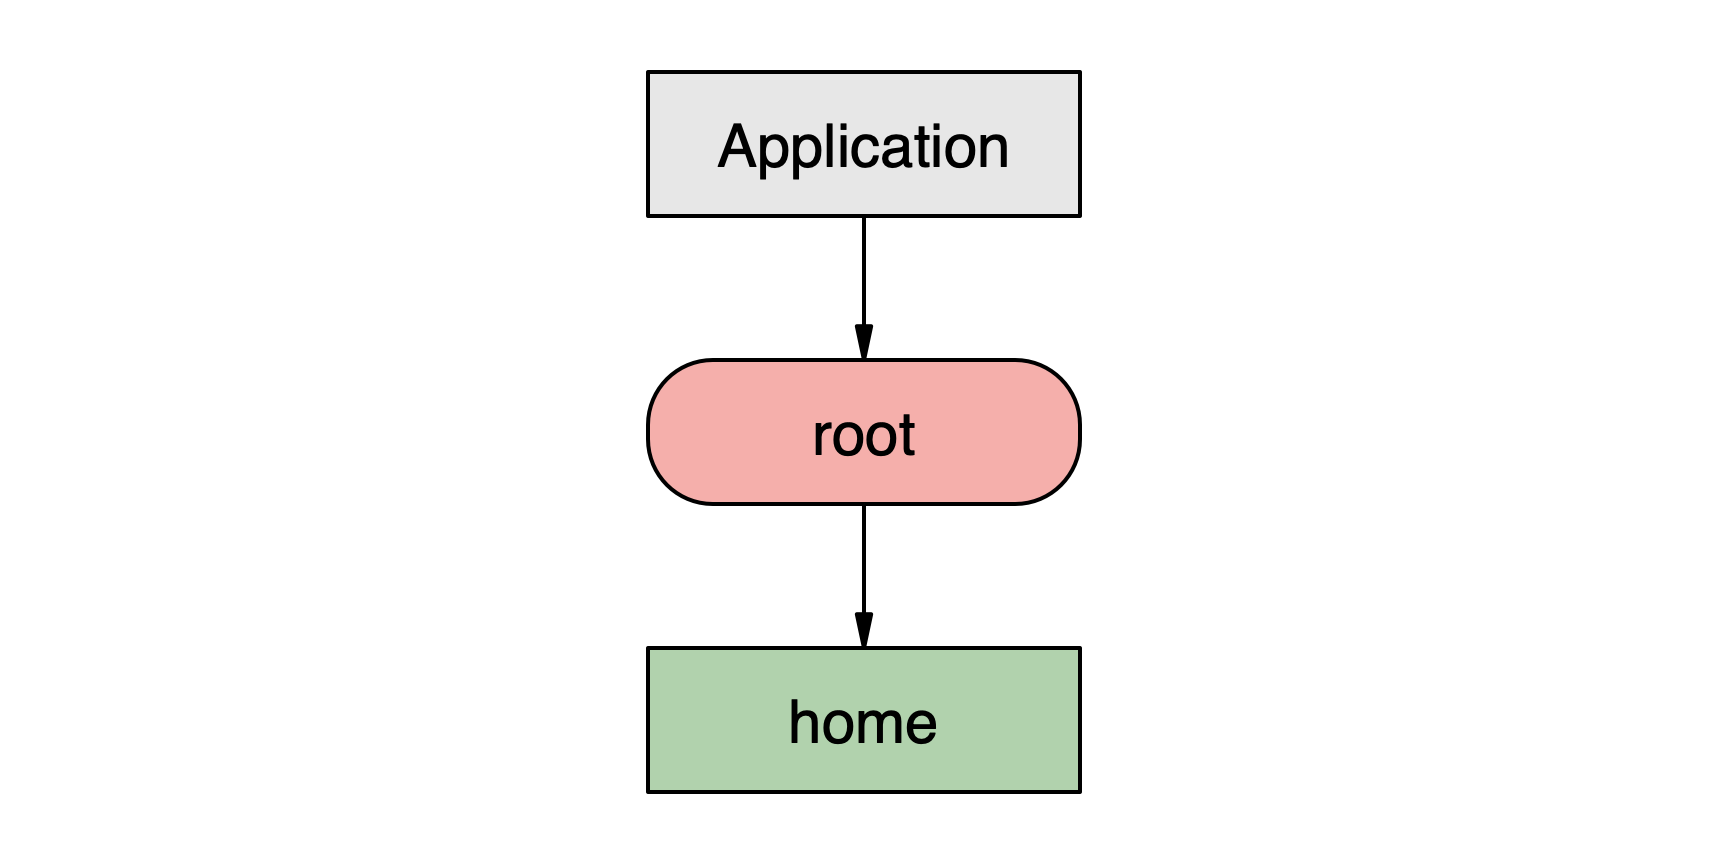
Diagram 2: Visualization of a simple stack navigator.
Nested navigators
Navigators can be nested inside other navigators as seen in the following example. This nesting can be defined within a single document or can be separated into multiple documents. The nesting is provided as a function of the <nav-route> element. The following two implementations will result in the same hierarchy.
Nested hierarchy example
index.xml
<doc xmlns="https://hyperview.org/hyperview">
  <navigator id="root" type="stack">
    <nav-route id="tabs">
      <navigator id="main" type="tab">
        <nav-route id="home" href="http://myapp.com/home.xml" />
        <nav-route id="profile" href="http://myapp.com/profile.xml" />
        <nav-route id="feed" href="http://myapp.com/feed.xml" />
      </navigator>
    </nav-route>
  </navigator>
</doc>
Example 3: Example HXML to create a tab navigator inside a stack navigator within a single document.
Note in this configuration, the “tabs” <nav-route> contains a child
so it does not require an “href” attribute.
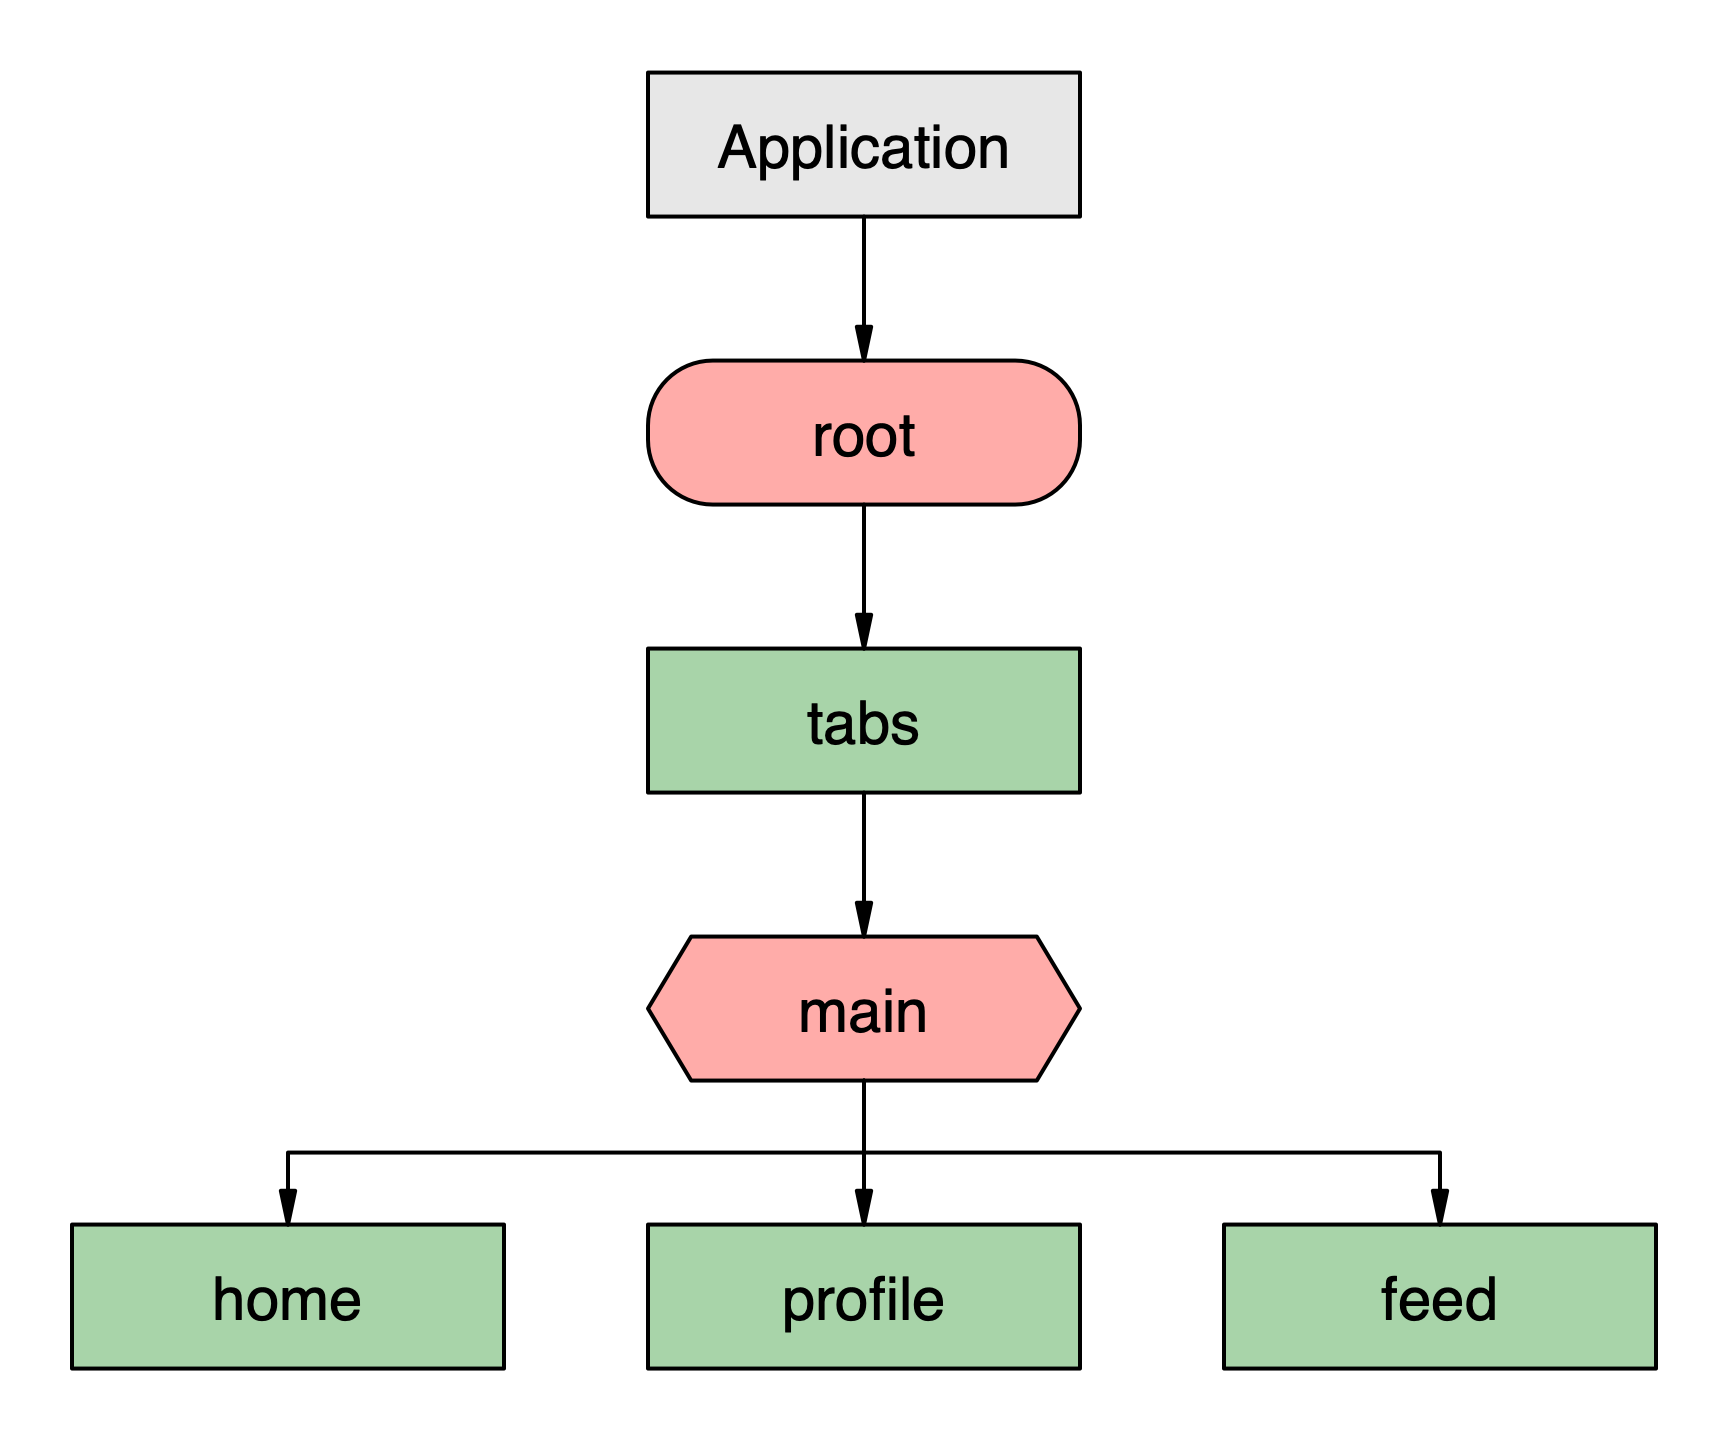
Diagram 3: Visualization of a complex hierarchy with nested navigators.
Separate document example
index.xml
<doc xmlns="https://hyperview.org/hyperview">
  <navigator id="root" type="stack">
    <nav-route id="tabs" href="http://myapp.com/tabs.xml" />
  </navigator>
</doc>
tabs.xml
<doc xmlns="https://hyperview.org/hyperview">
  <navigator id="main" type="tab">
    <nav-route id="home" href="http://myapp.com/home.xml" />
    <nav-route id="profile" href="http://myapp.com/profile.xml" />
    <nav-route id="feed" href="http://myapp.com/feed.xml" />
  </navigator>
</doc>
Example 4: Example HXML to create a tab navigator inside a stack navigator within multiple documents.
Note in this configuration, the “tabs” <nav-route> does not contain a child
so it requires an “href” attribute.
The benefits of separating out the navigation hierarchy into multiple documents include simplifying distributed development and providing the ability to dynamically populate parts of the navigation based on business logic. Consider the following example where we wish to provide different navigation options to a first time user than to a returning user.
index.xml
<doc xmlns="https://hyperview.org/hyperview">
  <navigator id="root" type="stack">
    {% if is_first_time_user %}
      <nav-route id="home" href="http://myapp.com/ftu.xml" />
    {% else %}
      <nav-route id="home" href="http://myapp.com/user.xml" />
    {% endif %}
  </navigator>
</doc>
ftu.xml
<doc xmlns="https://hyperview.org/hyperview">
  <navigator id="main" type="tab">
    <nav-route id="home" href="http://myapp.com/home.xml" />
    <nav-route id="profile" href="http://myapp.com/profile.xml" />
  </navigator>
</doc>
user.xml
<doc xmlns="https://hyperview.org/hyperview">
  <navigator id="main" type="tab">
    <nav-route id="home" href="http://myapp.com/home.xml" />
    <nav-route id="profile" href="http://myapp.com/profile.xml" />
    <nav-route id="feed" href="http://myapp.com/feed.xml" />
    <nav-route id="pro" href="http://myapp.com/pro.xml" />
  </navigator>
</doc>
Example 5: The nested “main” navigator is dynamically added into the “root” navigator at runtime based on client-side logic with either a simplified tab structure, or a complete set of tabs. Note that the use of the {% if %} syntax is not directly supported by Hyperview but is representative of syntax provided by Django, Nunjucks, or various other server-side template libraries.
Implementation
There are only a few requirements to implement navigation in Hyperview. The Hyperview component needs to be wrapped with a <NavigationContainer>. This dependency has been externalized to allow developers to integrate their own additional functionality. See react-navigation’s documentation of the NavigationContainer.
In previous versions of Hyperview, navigation was completely externalized and required passing various additional properties including “back”, “closeModal” and others. With the new approach, there's no need to provide these callbacks. Simply pass a url into the “entrypointUrl” property which contains a navigation document similar to those illustrated above. Hyperview will automatically create the necessary navigation hierarchy based on the elements in the document.
import Hyperview from 'hyperview';
import React from 'react';
import { NavigationContainer } from '@react-navigation/native';

export default () => {
  return (
    <NavigationContainer>
      <Hyperview
        entrypointUrl="http://myapp.com/index.xml"
        fetch={fetchWrapper}
        formatDate={formatDate}
      />
    </NavigationContainer>
  );
};
Example 6: Example implementation of a Hyperview component using internal navigation. Here the “index.xml” would contain a navigation definition like those described in the tab and stack examples above.
Navigating with Hyperview
Once Hyperview is passed an HXML navigation document, navigating is performed using Hyperview behaviors. Using a combination of action and trigger attributes a wide variety of navigation events are possible.
Actions
Hyperview includes support for behaviors designed to perform navigation. See the action section of Behavior Attributes in the Hyperview documentation.
push
The push action is used to add a route onto a stack navigator. This action will only work if there is at least one stack navigator within the navigation hierarchy. The push behavior must include an href attribute containing the url to load into the route.
The following demonstrates how to perform a push action within a stack navigator. The “home.xml” document below includes a behavior which uses the push action.
index.xml
<doc xmlns="https://hyperview.org/hyperview">
  <navigator id="root" type="stack">
    <nav-route id="home" href="http://myapp.com/home.xml" />
  </navigator>
</doc>
home.xml
<doc xmlns="https://hyperview.org/hyperview">
  <styles ... />
  <body>
    <view id="button" style="button">
      <behavior
        trigger="press"
        action="push"
        href="http://myapp.com/faq.xml"
      />
      <text>FAQs</text>
    </view>
  </body>
</doc>
Example 7: Example HXML showing a behavior with a push action to add a new route onto a stack navigator.

Diagram 4: The initial navigation state.
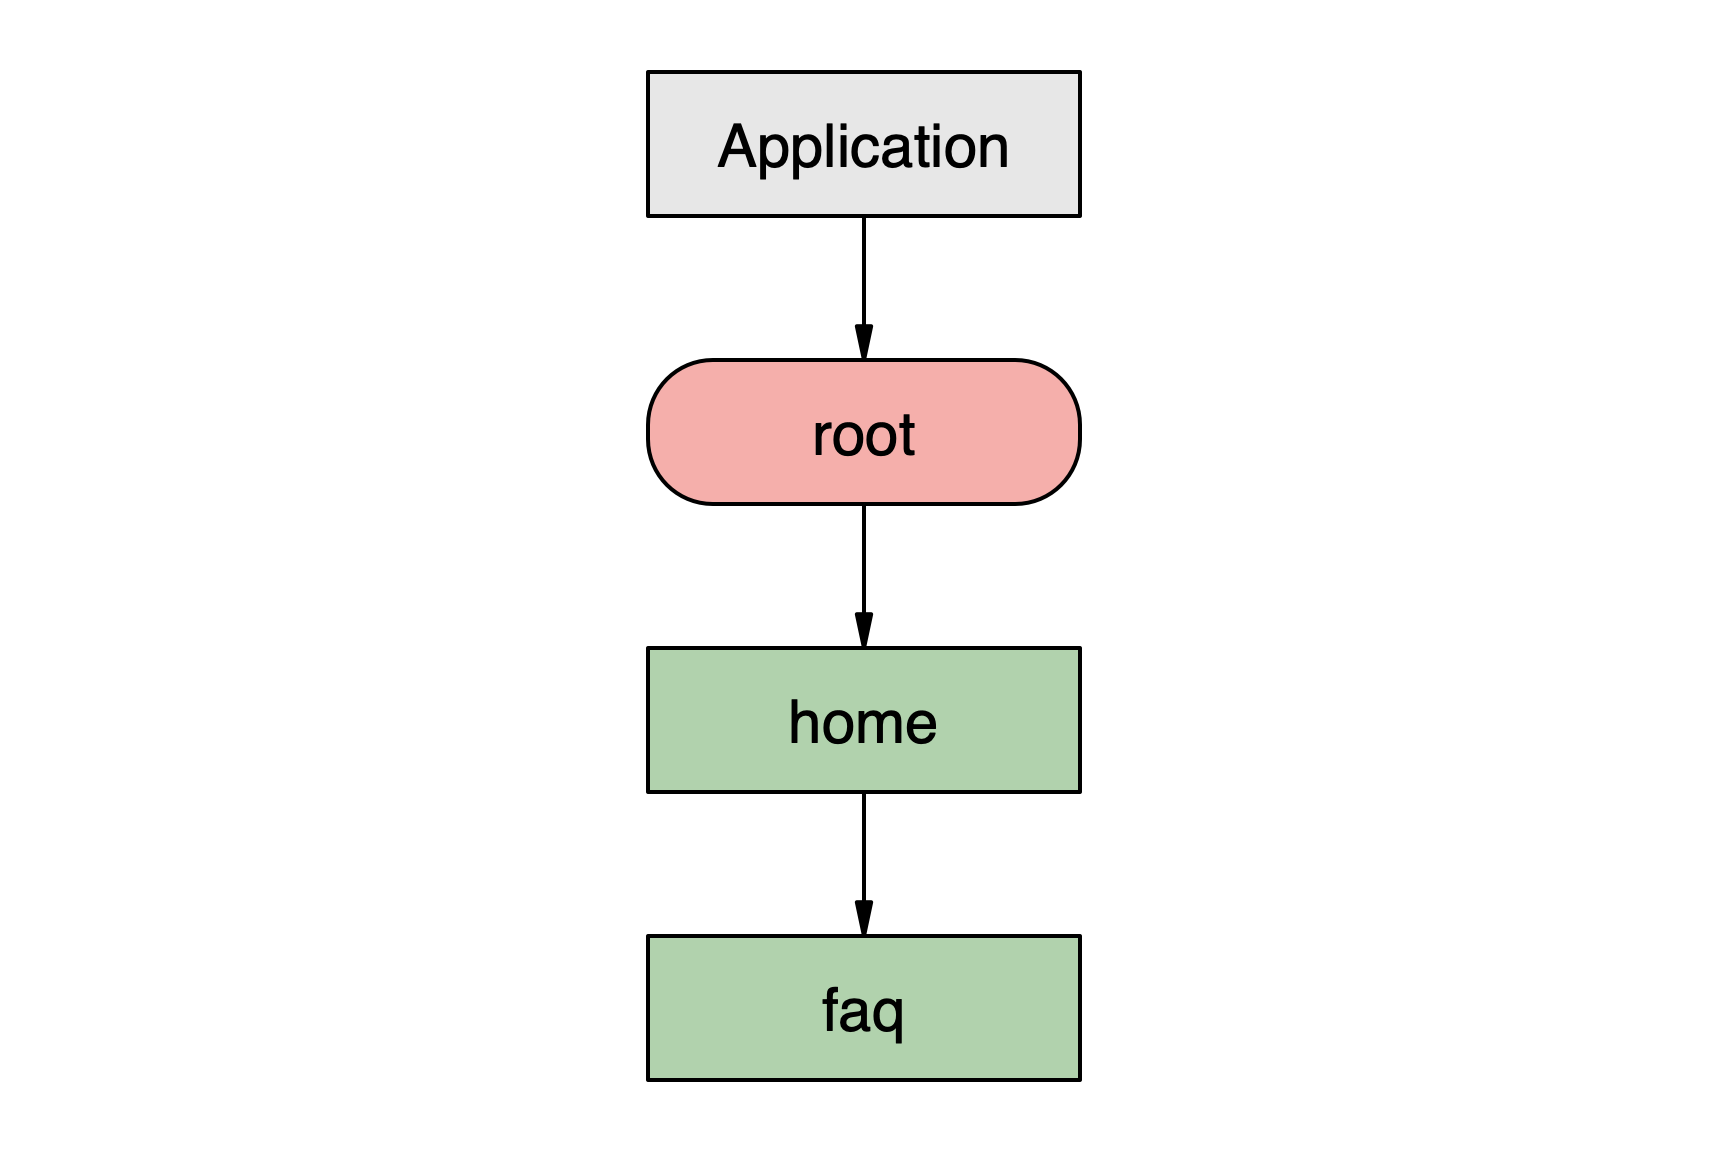
Diagram 5: The state after pushing the “faq” route.
When navigators are nested into more complex hierarchies, Hyperview will direct the request to the nearest stack navigator. In the diagrams below, the user is initially on the “home” route and then navigates to view the “faq” and then a topic. The “faq” route has been pushed onto the “root” stack navigator, followed by the “topic” route. Each new route is pushed in sequence onto the “root” navigator regardless of which other navigators exist within each route. Though the “tabs” route contains a tab navigator, they all lose focus as the new routes are pushed onto the stack.

Diagram 6: The initial navigation state.
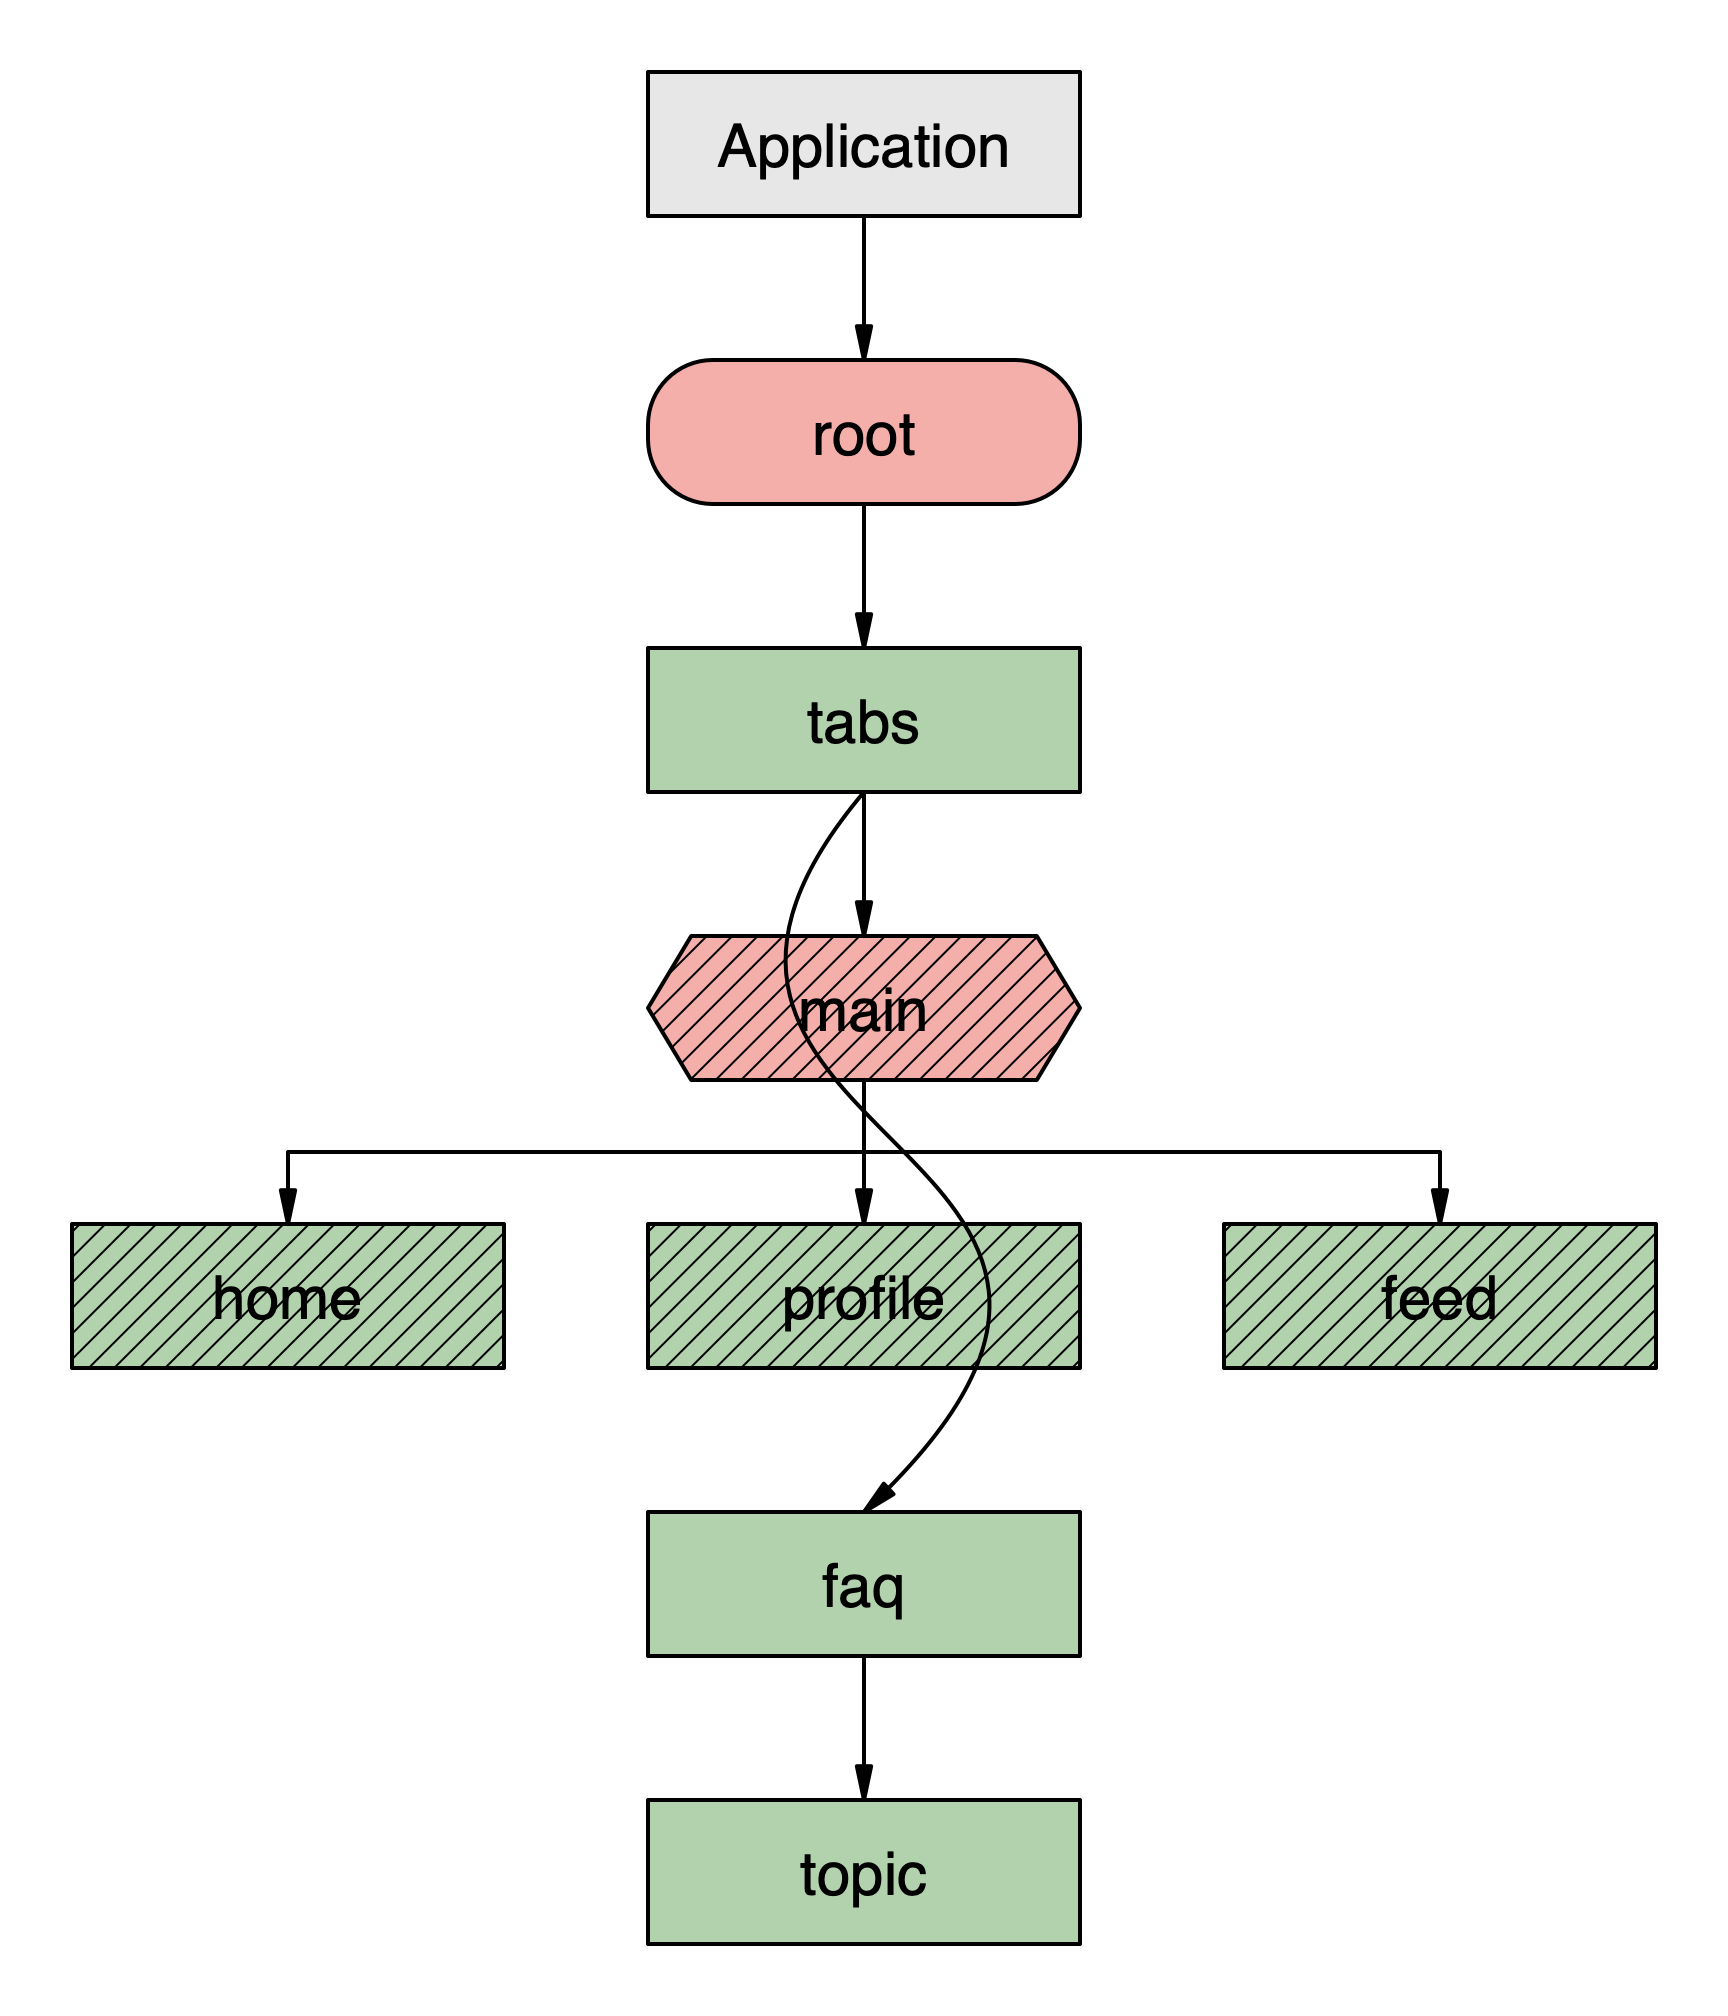
Diagram 7: The navigation state after pushing two routes onto the “root” stack navigator.
new
The new action is used to add a modal route onto a stack navigator. The implementation and rules of this action are identical to push with the only change being the presentation of the route as modal instead of card.
back
The back action will return the user to the previous route in a stack navigator. If the user is on the first route of a stack navigator, Hyperview will continue to look up the tree for any parent stack navigators. The last route of the highest stack navigator will not be removed. If no stack navigator is found, or no routes can be removed, the action is ignored. If an href attribute is included in the behavior, that value will be passed to the route which is focused after going back.
In the following example, the “home” route has pushed the “faq” route onto the stack. The “faq” contains a back action designed to go back to “home” but to provide a new url. This will have the effect of updating “home” with the new content provided in “home-update.xml”.
index.xml
<doc xmlns="https://hyperview.org/hyperview">
  <navigator id="root" type="stack">
    <nav-route id="home" href="http://myapp.com/home.xml" />
  </navigator>
</doc>
home.xml
<doc xmlns="https://hyperview.org/hyperview">
  <styles ... />
  <body>
    <view id="button" style="button">
      <behavior
        trigger="press"
        action="push"
        href="http://myapp.com/faq.xml"
      />
      <text>FAQs</text>
    </view>
  </body>
</doc>
faq.xml
<doc xmlns="https://hyperview.org/hyperview">
  <styles ... />
  <body>
    <view id="button" style="button">
      <behavior
        trigger="press"
        action="back"
        href="http://myapp.com/home-update.xml"
      />
      <text>FAQs</text>
    </view>
  </body>
</doc>
Example 8: Example HXML showing a behavior with a back action to remove a route from a stack navigator.

Diagram 8: A stack navigator before using a back behavior.
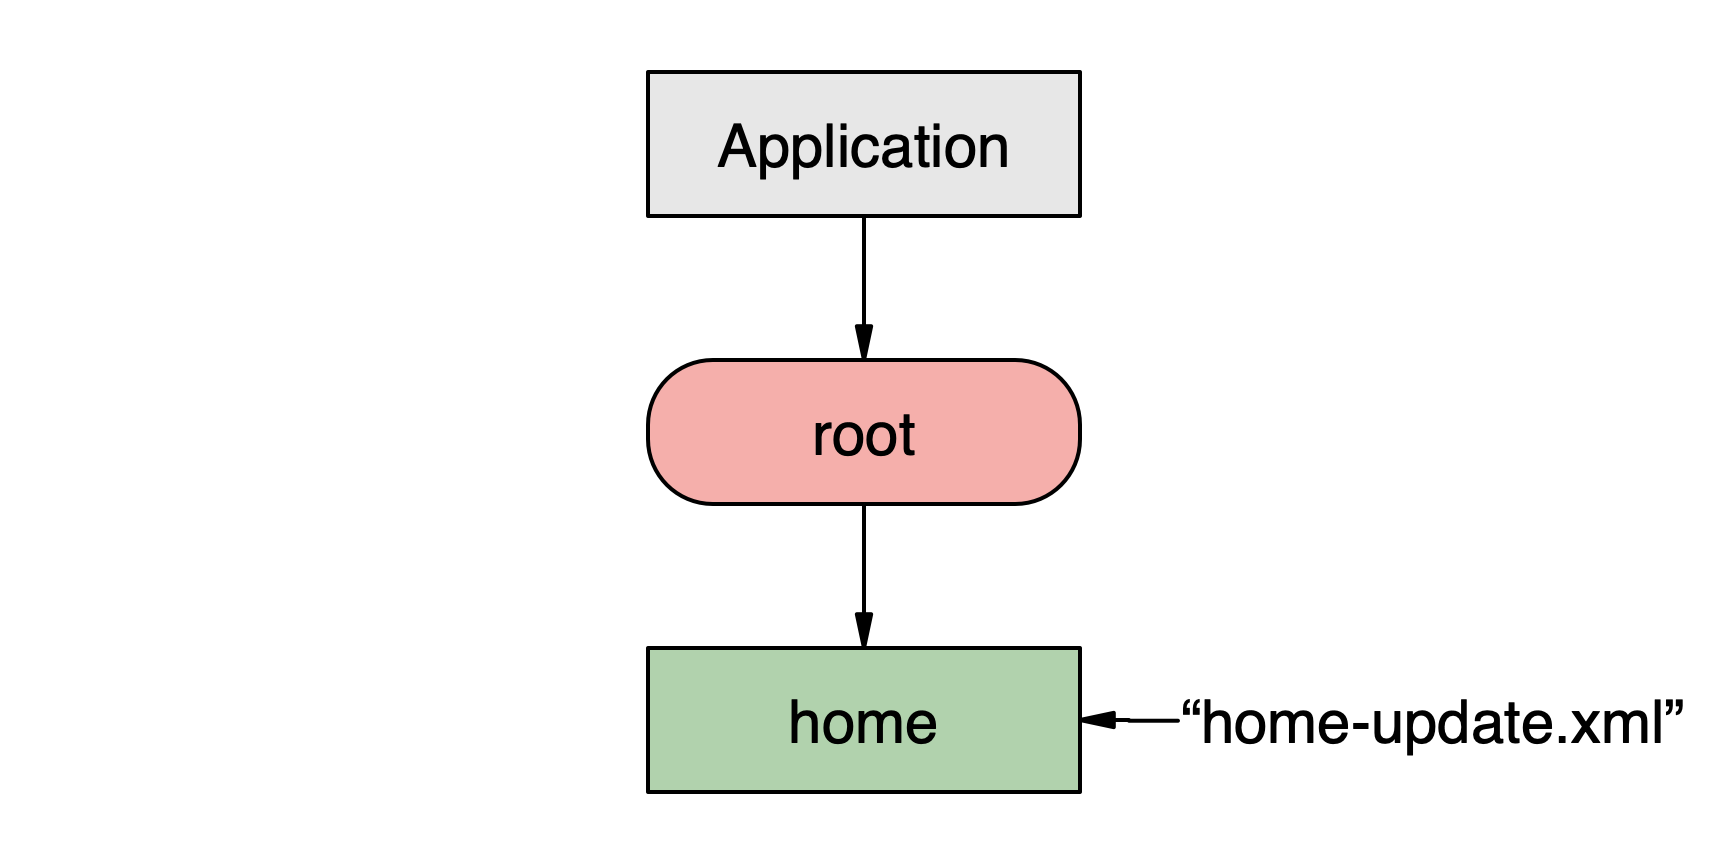
Diagram 9: A stack navigator after a back behavior has removed a route. Note that the contents of “home” will be updated with the contents of “home-update.xml” which was included in the back behavior.
The back action is intended to go back one route. To go back to a specific earlier screen, use the navigate or close action instead.
close
The close action is intended to close modal routes. It will search up the tree for the first modal route it finds and will close it resulting in the preceding route gaining focus. If no modal is open, the action is ignored. As with the back action, close supports passing an href value which will be passed into the route which receives focus after the close is complete.
In the following diagrams, the “help” route has been opened as a modal followed by the “topic” route (diagram 10). When the close action is triggered, the “help” modal is closed resulting in the user seeing the “home” route (diagram 11).
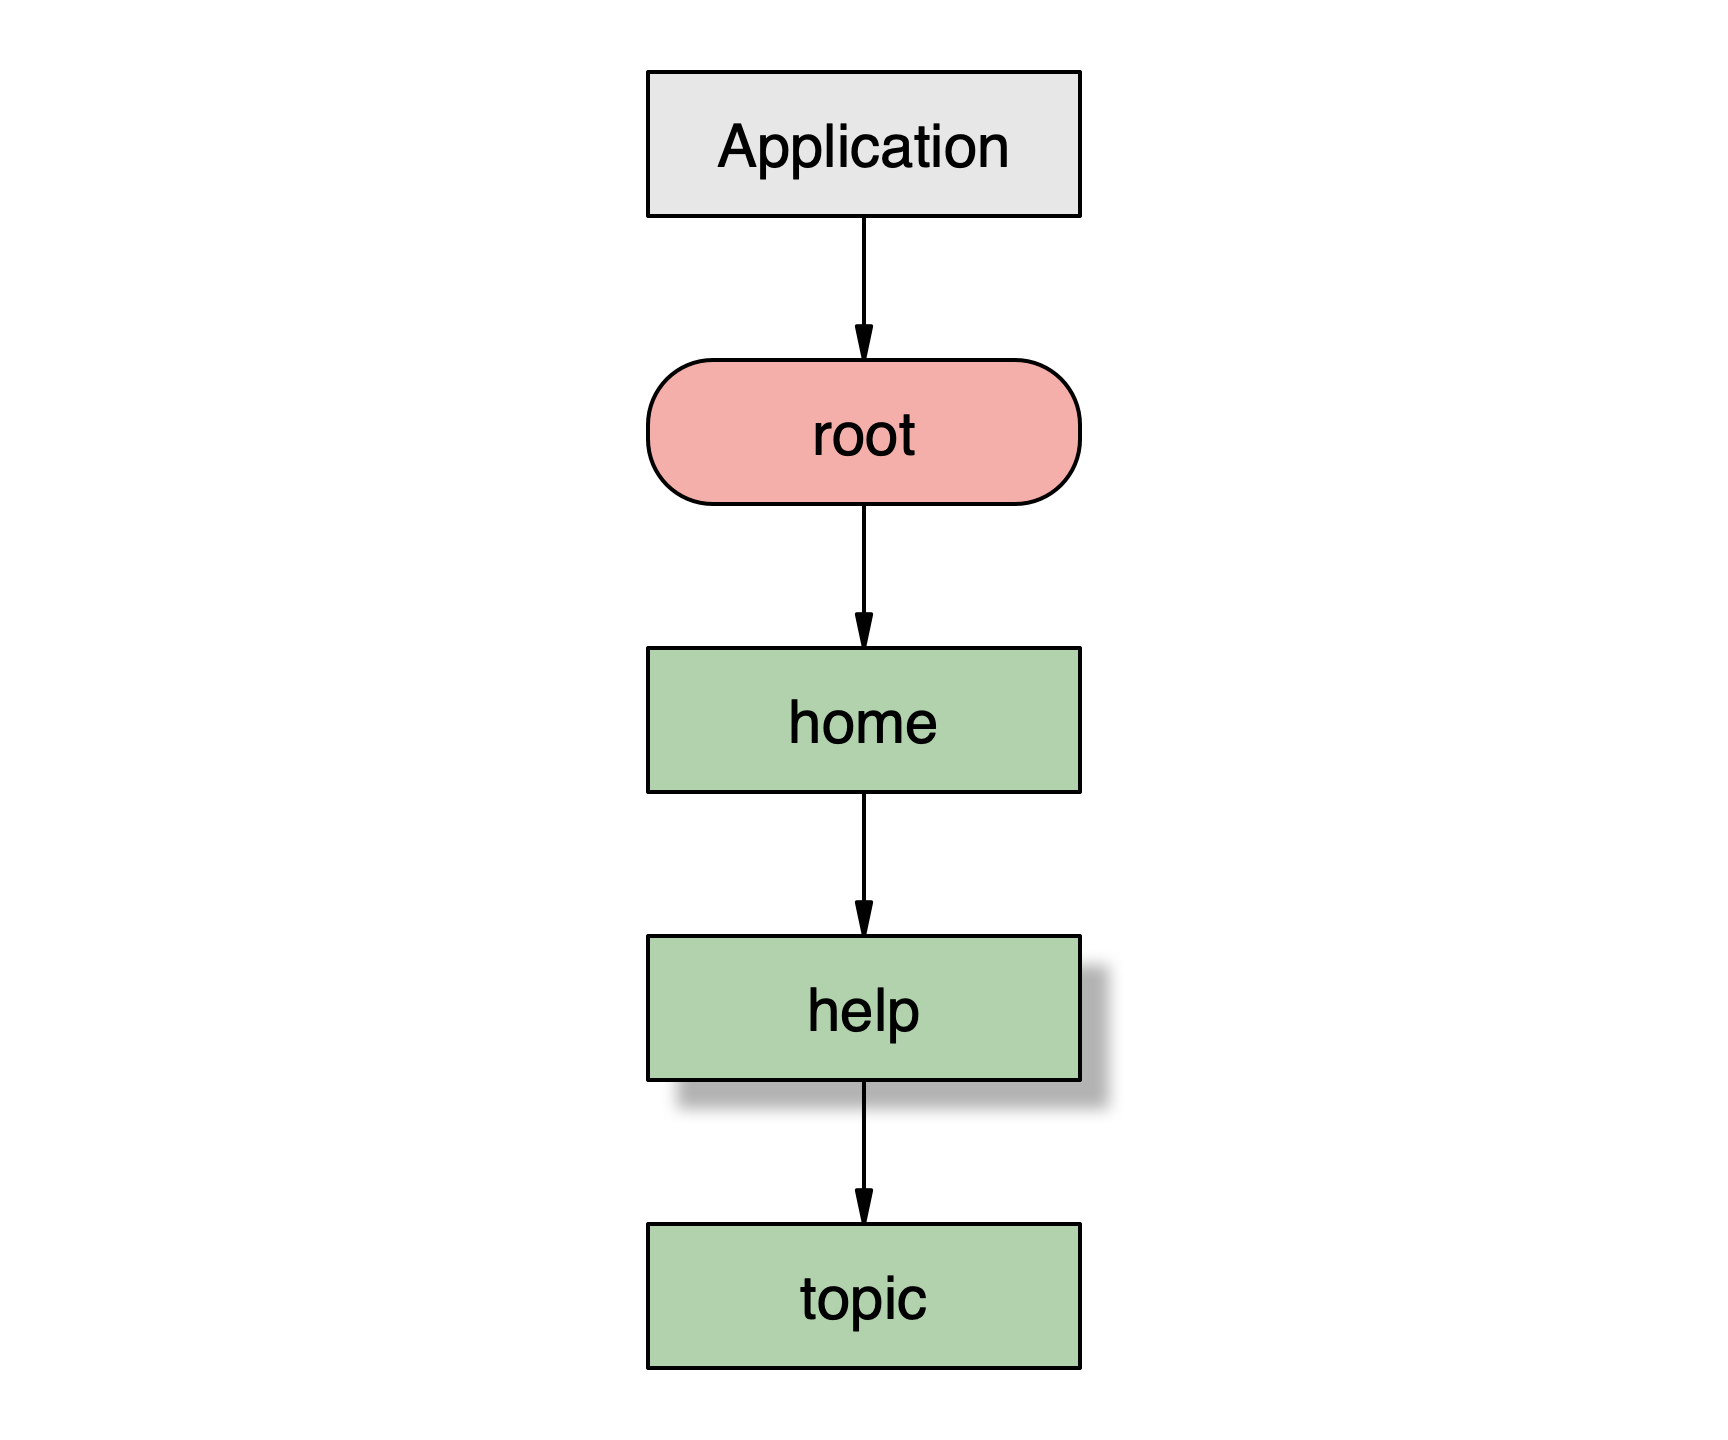
Diagram 10: The navigation state with the “help” route as a modal and the “topic” route pushed onto the stack.

Diagram 11: The navigation state after the close action has been triggered and the “topic” and “help” routes have been removed.
navigate
The navigate action is used in different ways depending on the type of navigator which handles the behavior as well as the state of the navigator. The navigate action may include an href attribute which will be used to either refresh an existing route or provide the initial path for a new route.
For a tab navigator, navigate is used to switch between tabs. The desired tab can be targeted by using an href attribute with a hash symbol followed by the id of the route to navigate to (“#profile”). For more on href options, see Navigation targets section.
index.xml
<doc xmlns="https://hyperview.org/hyperview">
  <navigator id="main" type="tab">
    <nav-route id="home" href="http://myapp.com/home.xml" />
    <nav-route id="profile" href="http://myapp.com/profile.xml" />
  </navigator>
</doc>
home.xml
<doc xmlns="https://hyperview.org/hyperview">
  <styles ... />
  <body>
    <view id="button" style="button">
      <behavior
        trigger="press"
        action="navigate"
        href="#profile"
      />
      <text>Profile</text>
    </view>
  </body>
</doc>
profile.xml
<doc xmlns="https://hyperview.org/hyperview">
  <styles ... />
  <body>
    <view id="button" style="button">
      <behavior
        trigger="press"
        action="navigate"
        href="#home"
      />
      <text>Home</text>
    </view>
  </body>
</doc>
Example 9: Example HXML showing a tab navigator with routes “home” and “profile” which navigate between them.
In stack navigators, the navigate action can create one of two results depending on the current state. If the target route does not exist in the current navigator or any stack navigators above it, the action will act as a push action adding the route onto the stack. See push action examples above for more information. If the target route already exists in a navigator, navigate acts like a “go back to”. Any routes between the current and the found route will be removed from the navigator and the user will be returned to the found route.
The determination of whether a route already exists in a stack is based on the value passed in the href attribute. Only exact matches will be found.
In the following example, the “help” route provides two behaviors with navigate actions. The “home” behavior works as a back action since the route is already in the stack. The “topic” behavior works as a push action as there is no route with the same url.
index.xml
<doc xmlns="https://hyperview.org/hyperview">
  <navigator id="root" type="stack">
    <nav-route id="home" href="http://myapp.com/home.xml" />
  </navigator>
</doc>
home.xml
<doc xmlns="https://hyperview.org/hyperview">
  <styles ... />
  <body>
    <view id="button" style="button">
      <behavior
        trigger="press"
        action="new"
        href="http://myapp.com/help.xml"
      />
      <text>Help</text>
    </view>
  </body>
</doc>
help.xml
<doc xmlns="https://hyperview.org/hyperview">
  <styles ... />
  <body>
    <view id="button" style="button">
      <behavior
        trigger="press"
        action="navigate"
        href="http://myapp.com/home.xml"
      />
      <text>Home</text>
    </view>
    <view id="button" style="button">
      <behavior
        trigger="press"
        action="navigate"
        href="http://myapp.com/topic.xml"
      />
      <text>Help topic</text>
    </view>
  </body>
</doc>
Example 10: Example HXML showing two behaviors using navigate actions which produce different results.
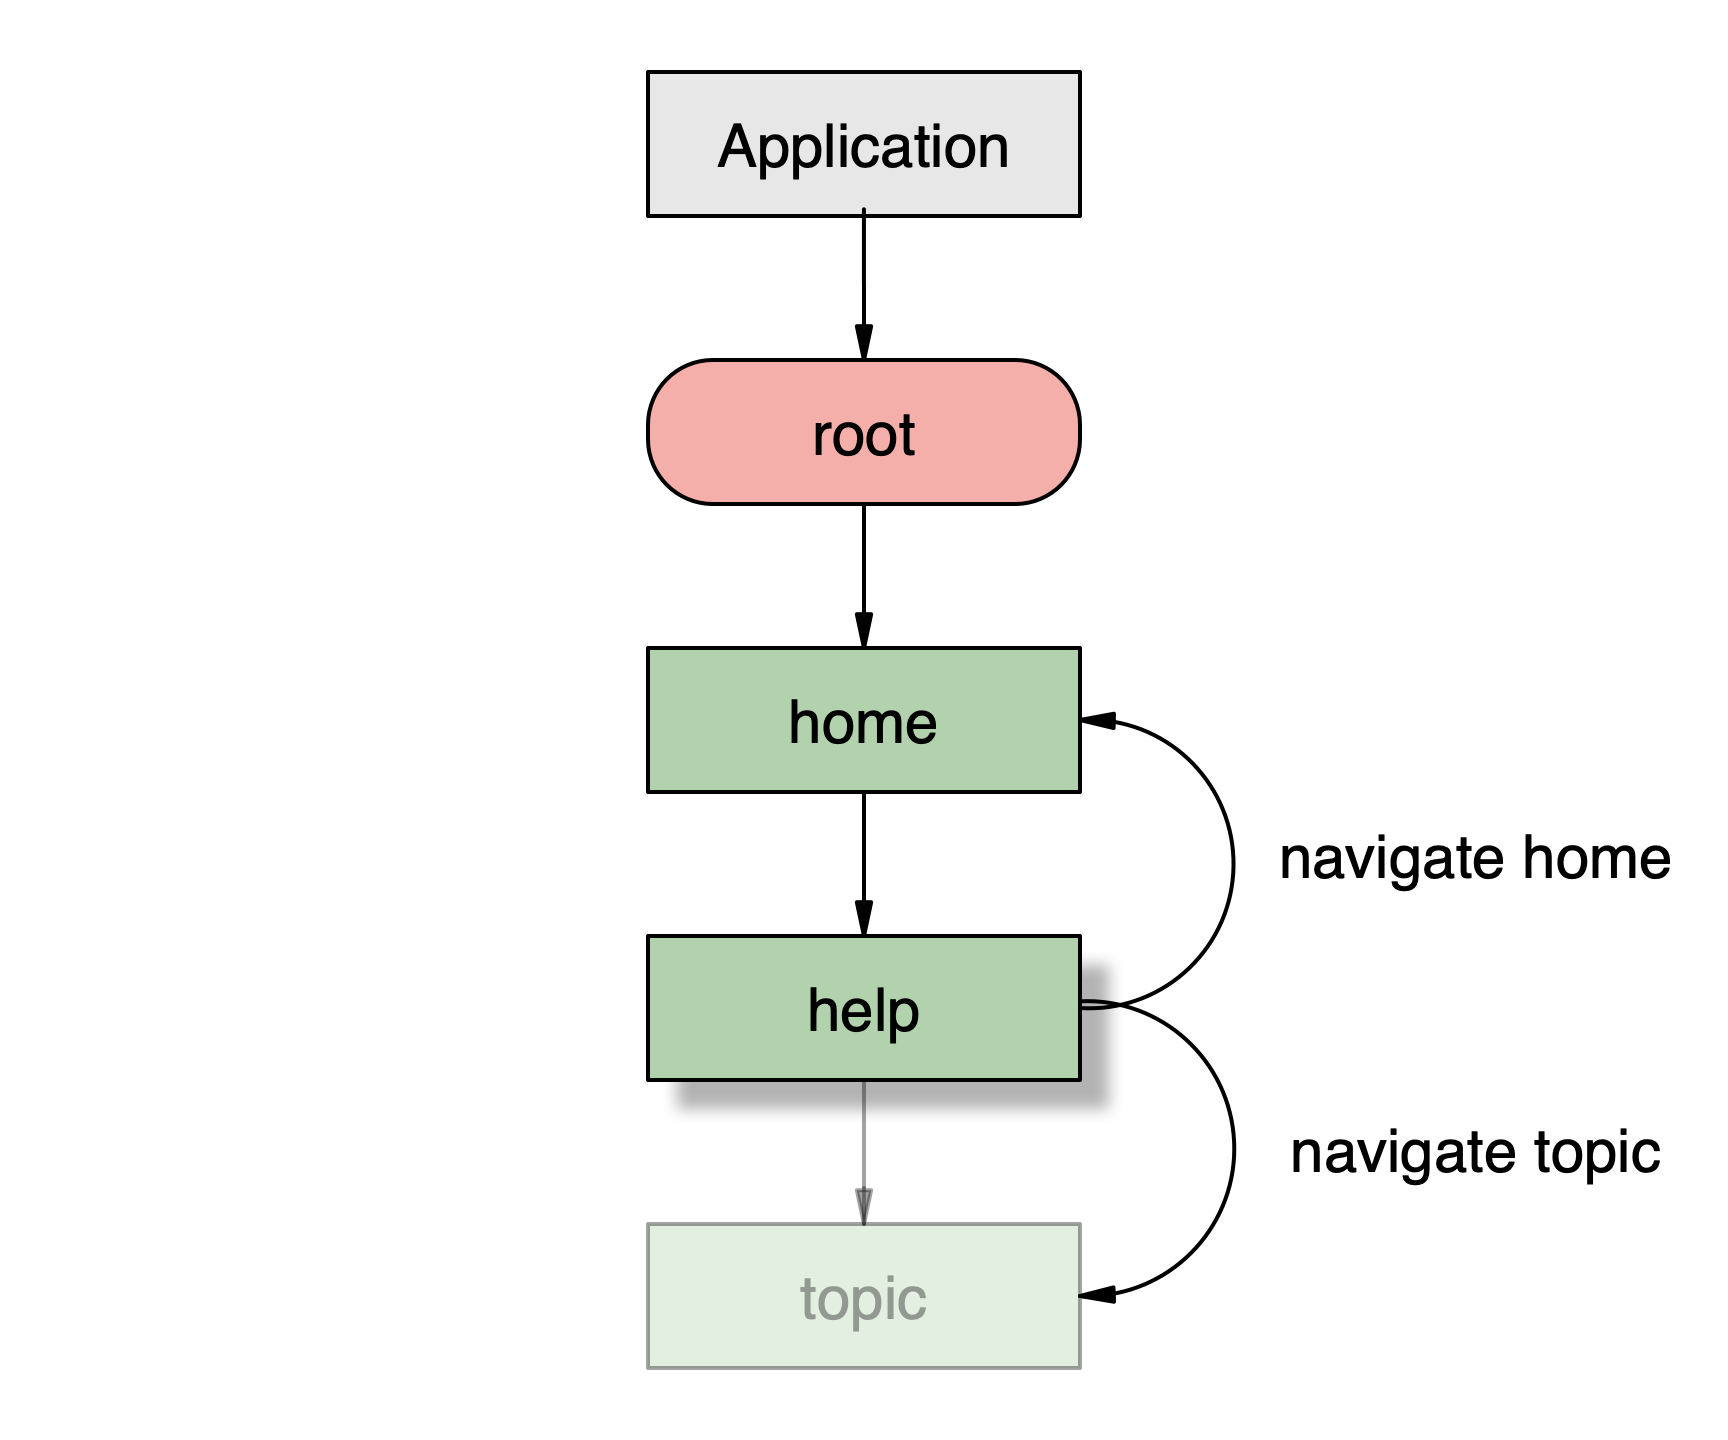
Diagram 12: Visualization of the different navigation effects performed by the navigate action based on whether a route exists in the stack.
Navigation targets
One element which most actions share is the need to handle targeting specific routes. Targeting is handled in a few ways depending on the action, the state, and the desired navigation effect. Hyperview behaviors use the href attribute to target navigation actions.
The href attribute is used in all of the navigation actions. In push and new the href value provides the url to use to populate the newly added route. In back and close actions, the href value is optionally used to update the route which will gain focus after closing or going back. For navigate actions, the href value is more nuanced. The functionality of the href attribute is affected by how a route is added into a navigation hierarchy. Hyperview supports two kinds of routes: static and dynamic.
Static routes are those which are defined in HXML in navigation documents as seen in the Navigators section above. They provide a known structure, order, and naming. Static routes can be targeted in behaviors using the #{nav-route id} syntax in the href attribute. In the navigate action examples above, the tab selection was accomplished using this syntax (href=“#profile”).
Dynamic routes are those which are added dynamically through push, new, or navigate actions. Their ids are dynamically generated and are not predictable. When targeting dynamic routes, we use the entire url for the href value. In the navigate action examples above, the entire url (href="http://myapp.com/topic.xml") is used to either navigate back to a previous route or to push a new route. This enables the navigate action to intelligently either return to a previous route within the stack, or to push a new one.
While it is possible to use complete urls to navigate between tabs of a tab navigator, if the tab navigator is nested inside a stack navigator, the actions will be sent to the stack and will perform push actions instead of switching between tabs. It is safer to use the hash syntax.
Triggers
Hyperview’s behaviors can be triggered by various user or system interactions. While most of these are not navigation related, there is support for navigation specific triggers. See the trigger section of Behavior Attributes in the Hyperview documentation.
back
In most places within an application, the user is free to navigate forwards and backwards as needed. However, there are certain situations where we may want to temporarily disable their ability to leave a screen. Examples of this include incomplete forms, timed screens, or screens only intended to be seen a single time.
The inclusion of a behavior with a back trigger on a route will ensure the route cannot be removed from view through any of the navigation actions covered previously. The block will remain in place as long as the behavior is present and visible. Hyperview ensures that attempts to navigate away are blocked from all methods including navigation behaviors, Android physical back button presses, and iOS swipes.
The following example demonstrates how a back trigger can be implemented and then later disabled to allow the user to resume normal navigation. In this document, a behavior is present with a load trigger. When the user attempts to leave the screen, the back behavior is triggered which opens an alert. The alert contains a cancel option which simply closes the alert. When the user presses the “OK” option, two additional behaviors are triggered. The first performs a hide action which will hide the view containing the back trigger, rendering it inactive. The second behavior performs the back action which will take the user back to the previous route.
<doc xmlns="https://hyperview.org/hyperview">
  <screen>
    <styles ... />
    <body>
      ...
      <view id="back_behaviors">
        <behavior
          trigger="back"
          action="alert"
          alert:message="Are you sure you want to go back?"
          alert:title="Back confirmation"
          xmlns:alert="https://hyperview.org/hyperview-alert"
        >
        <alert:option alert:label="OK">
          <behavior action="hide" target="back_behaviors" />
          <!-- the "delay" attribute is used to ensure the hide completes before 'back' is performed -->
          <behavior action="back" delay="1"/>
        </alert:option>
        <alert:option alert:label="Cancel" />
      </behavior>
    </view>
    </body>
  </screen>
</doc>
Example 11: Example HXML showing the implementation of a back trigger which blocks the user’s ability to leave a screen until making a decision.
Navigator behaviors
Most Hyperview behaviors belong on individual routes to enable performing actions based on either user input or changes in state. However, there are a few areas where including behaviors within a <navigator> element can enhance functionality.
load
The <navigator> element supports behaviors with a trigger of load. These behaviors will be triggered the first time the navigator element is loaded. The benefit of including a load behavior in the navigator is that the behavior will be triggered the moment the navigator is ready regardless of which route is focused.
<doc xmlns="https://hyperview.org/hyperview">
  <navigator id="root" type="tab">
    <behavior trigger="load" action="custom-track" data="main" />
    <nav-route id="home" href="http://myapp.com/home.xml" />
    <nav-route id="profile" href="http://myapp.com/profile.xml" />
    <nav-route id="feed" href="http://myapp.com/feed.xml" />
  </navigator>
</doc>
Example 12: Example HXML showing a tab navigator with a load behavior.
Imagine we want to trigger a tracking event when the user arrives at the main user interface. There are three different tabs and the user may not always start on the first tab. If we were to put the tracking behavior into the routes, we would have to include it on each route and then would have to create additional logic to avoid sending it again when the user navigates to the other routes. Putting the behavior at the navigator level ensures the behavior is triggered only once regardless of which route is selected.

Diagram 13: Visualization of a simple tab navigator.
Initial state
The HXML schema supports defining an initial state for each navigator type. This allows developers to control which route a user sees when the navigator is created. This feature can be useful to allow a user to resume from their last state or to lead them to a particular area of the application. For tab navigators, the selected attribute is used. By default a tab navigator will select the first route defined, but using the selected attribute allows selecting a different route.
<doc xmlns="https://hyperview.org/hyperview">
  <navigator id="root" type="tab">
    <nav-route id="home" href="http://myapp.com/home.xml" />
    <nav-route
      id="profile"
      href="http://myapp.com/profile.xml"
      selected="true"
    />
    <nav-route id="feed" href="http://myapp.com/feed.xml" />
  </navigator>
</doc>
Example 13: tab navigator with “profile” route selected.
If more than one route is marked as selected, the first route found with a value of "true" will be used.
A different approach is required for stack navigators where the most recently added route has focus. When defining a stack navigator, adding routes into the navigator will set the initial state. In the diagram below, a user has navigated from “home” to “help” (as a modal) to a “topic”.

Diagram 14: A stack navigator with three routes.
This state can be described using the following HXML. Hyperview will create the navigator with this initial state and the user will be able to close or back out of the screens as they would if they had navigated to this location.
<doc xmlns="https://hyperview.org/hyperview">
  <navigator id="root" type="stack">
    <nav-route id="home" href="http://myapp.com/home.xml" />
    <nav-route id="help" href="http://myapp.com/help.xml" modal="true" />
    <nav-route id="topic" href="http://myapp.com/topic.xml" />
  </navigator>
</doc>
Example 14: stack navigator with an initial state defined including three routes, one of which is using a modal presentation.
Navigation UI
The core Hyperview library does not currently provide navigation UI components out-of-the-box, such as tab bars. However, it is easy to define your own navigation UI components using HXML.
Header
A navigation header can be created within the <header> element of any route document. The following example shows how to create a simple header.
<doc xmlns="https://hyperview.org/hyperview">
  <screen>
    <styles>
      <style id="Header" flexDirection="row" />
      <style id="Header__Back" color="blue" fontSize="16" />
    <body>
      <header style="Header">
        <text action="back" href="#" style="Header__Back">Back</text>
      </header>
      ...
    </body>
  </screen>
</doc>
Example 15: A simple header providing back navigation.
Tab bar
A tab bar can be created using <view> elements on each tab’s document. To create the effect of a selected state, apply alternate styling on the current route. The following example shows how a tab bar can be created with a “home” and a “profile” tab.
home.xml
<doc xmlns="https://hyperview.org/hyperview">
  <screen>
    <styles ... />
    <body>
      ...
      <view id="Footer" style="Footer">
        <view style="Bottom_Tab Bottom_Tab__Selected">
          <image
            source="/navigator/simple_tab/home.png"
            style="Bottom_Tab__Icon Bottom_Tab__Selected"
          />
          <text style="Bottom_Tab__Label Bottom_Tab__Label__Selected">Home</text>
        </view>
        <view
          style="Bottom_Tab"
          href-style="Bottom_Tab"
          action="navigate"
          target="tab-2"
        >
          <image
            source="/navigator/simple_tab/profile.png"
            style="Bottom_Tab__Icon "
          />
          <text style="Bottom_Tab__Label">Profile</text>
        </view>
      </view>
    </body>
  </screen>
</doc>
profile.xml
<doc xmlns="https://hyperview.org/hyperview">
  <screen>
    <styles ... />
    <body>
      ...
      <view id="Footer" style="Footer">
        <view
          style="Bottom_Tab"
          href-style="Bottom_Tab"
          action="navigate"
          target="tab-1"
        >
          <image
            source="/navigator/simple_tab/home.png"
            style="Bottom_Tab__Icon "
          />
          <text style="Bottom_Tab__Label">Home</text>
        </view>
        <view style="Bottom_Tab Bottom_Tab__Selected">
          <image
            source="/navigator/simple_tab/profile.png"
            style="Bottom_Tab__Icon Bottom_Tab__Selected"
          />
          <text style="Bottom_Tab__Label Bottom_Tab__Label__Selected">Profile</text>
        </view>
      </view>
    </body>
  </screen>
</doc>
Example 16: Example HXML showing the implementation of a tab bar. Each document includes both tabs but applies alternate styling and removes behaviors on the view representing the current selection.
Deep links
Deep links are supported by providing an updated navigation document to Hyperview through the “entrypointUrl” property. Each time this url is updated, Hyperview will update and re-render the navigation structure. The attributes available for <navigator> and <nav-route> elements can affect how the navigation changes when the document is updated. The implementation details of capturing the deep link url and assigning a new document are not part of Hyperview’s solution.
Simple example
The following simple example illustrates how a deep link document can be used to change the state of the navigation hierarchy. In the initial “index.xml” presented to the user, they are provided with a basic tabbed navigation with “home”, “profile” and “feed” tabs. When the “deeplink.xml” is passed into Hyperview, the navigation hierarchy is replaced with the new state.
The “profile” tab uses the “selected” attribute to change the selection. The result of passing the revised document state into Hyperview is that the user will be navigated to the “profile” tab. If they are already on this tab, no action is performed.
index.xml
<doc xmlns="https://hyperview.org/hyperview">
  <navigator id="root" type="tab">
    <nav-route id="home" href="http://myapp.com/home.xml" />
    <nav-route id="profile" href="http://myapp.com/profile.xml" />
    <nav-route id="feed" href="http://myapp.com/feed.xml" />
  </navigator>
</doc>
deeplink.xml
<doc xmlns="https://hyperview.org/hyperview">
  <navigator id="root" type="tab">
    <nav-route id="home" href="http://myapp.com/home.xml" />
    <nav-route
      id="profile"
      href="http://myapp.com/profile.xml"
      selected="true"
    />
    <nav-route id="feed" href="http://myapp.com/feed.xml" />
  </navigator>
</doc>
Example 17: Example of an initial navigation document and an updated document passed as a deep link.
Complex example
As discussed previously, the navigation system allows nesting navigators. Deep links can update nested hierarchies however, unlike the separate documents in the Nested navigators example, deep links must contain the entire updated hierarchy in a single document.
The following example shows how a deep link can update the state of a nested navigation hierarchy. The user is initially in a state where they have three tabs to choose from. When the deep link is passed in, two things happen simultaneously. The first is that a new tab is added to the tab navigator and is marked as selected. This will navigate the user to the new tab. The second change in the deep link is a new route “help” has been added to the stack navigator. Any time a route is added to a stack navigator, it is pushed on top of the stack and becomes focused. This new route is marked with the “modal” attribute so it will be shown with modal presentation. The end result is the user will see the “help” route and when they close it, they will be on the “tips” tab.
index.xml
<doc xmlns="https://hyperview.org/hyperview">
  <navigator id="root" type="stack">
    <nav-route id="tabs">
      <navigator id="main" type="tab">
        <nav-route id="home" href="http://myapp.com/home.xml" />
        <nav-route id="profile" href="http://myapp.com/profile.xml" />
        <nav-route id="feed" href="http://myapp.com/feed.xml" />
      </navigator>
    </nav-route>
  </navigator>
</doc>
deeplink.xml
<doc xmlns="https://hyperview.org/hyperview">
  <navigator id="root" type="stack">
    <nav-route id="tabs">
      <navigator id="main" type="tab">
        <nav-route id="home" href="http://myapp.com/home.xml" />
        <nav-route id="profile" href="http://myapp.com/profile.xml" />
        <nav-route id="feed" href="http://myapp.com/feed.xml" />
        <nav-route id="tips" href="http://myapp.com/tips.xml" selected="true" />
      </navigator>
    </nav-route>
    <nav-route id="help" href="http://myapp.com/help.xml" modal="true" />
  </navigator>
</doc>
Example 18: Example of a nested navigation state and a deep link which alters the user’s state by adding a new tab and popping a modal over it.
Merging example
The previous deep link examples showed how to replace the entire navigation hierarchy with a new one. Hyperview also supports the ability to merge a new state with an existing state. This functionality can be useful in places where the developer wishes to add functionality while still maintaining parts of the user’s current state.
Using the same example as above, if we wanted to add a new “tips” tab and open a modal but we didn’t want the user to lose their current tab selection, we could use the merge attribute of the <navigator> elements. This will have the effect of adding just the parts that are different between the existing state and the new one. For example, if the user was on the “profile” tab before the deep link was received, the resulting state change would have the user see the “help” modal and when they close it, they would still be on “profile”, but would also have a new “tips” tab available.
index.xml
<doc xmlns="https://hyperview.org/hyperview">
  <navigator id="root" type="stack">
    <nav-route id="tabs">
      <navigator id="main" type="tab">
        <nav-route id="home" href="http://myapp.com/home.xml" />
        <nav-route id="profile" href="http://myapp.com/profile.xml" />
        <nav-route id="feed" href="http://myapp.com/feed.xml" />
      </navigator>
    </nav-route>
  </navigator>
</doc>
deeplink.xml
<doc xmlns="https://hyperview.org/hyperview">
  <navigator id="root" type="stack" merge="true">
    <nav-route id="tabs">
      <navigator id="main" type="tab" merge="true">
        <nav-route id="home" href="http://myapp.com/home.xml" />
        <nav-route id="profile" href="http://myapp.com/profile.xml" />
        <nav-route id="feed" href="http://myapp.com/feed.xml" />
        <nav-route id="tips" href="http://myapp.com/tips.xml" />
      </navigator>
    </nav-route>
    <nav-route id="help" href="http://myapp.com/help.xml" modal="true" />
  </navigator>
</doc>
Example 19: Example of a nested navigation state and a deep link which merges with the existing state.
Best Practices
The following guidelines can help to maximize success when building dynamic navigation solutions.
- It is often useful to have a top level stack navigator present in any navigation hierarchy. This will ensure a modal can be presented to the user from any location within the application. When using the new or push actions in a Hyperview behavior, the closest stack navigator will be targeted. This structure is illustrated in the Nested navigators section above.
- When linking to deep locations in nested navigators, the entire hierarchy to the link needs to be present. The deep link will not automatically load the href address in each route.
- When providing a deep link, the initial state can never be assumed. In the case where a deep link is used to launch the application, the deep link is the initial state and should provide a full user experience.
- When providing a deep link using merging, each <navigator> in the hierarchy should be marked for merging otherwise the higher <navigator> elements will replace their state.
- The merge attribute can be used to append routes to an existing state. To remove items, do not use the merge attribute, replace the entire navigator with the new state.
