Every mature codebase eventually needs a thorough spring cleaning. Over the last few months, we've been working hard on improvements to Hyperview, removing legacy code, improving render performance, refining APIs, and building a better product.
Performance Improvements
One of the most significant improvements in recent releases is a substantial reduction in view redraws throughout Hyperview. Starting with version 0.94.0, our optimization work has streamlined the rendering pipeline, resulting in measurably better performance across the framework, providing up to a 50% reduction in render time and re-renders.
These improvements mean your Hyperview apps will feel smoother and more responsive, especially in complex screens with frequent updates or dynamic content.
Code Cleanup and Consolidation
It has been over a year since we released an integrated navigation solution into Hyperview, marking a major milestone in the framework's evolution. The integrated navigation has been very successful in providing the flexibility and features that both our internal team and the broader Hyperview community have come to rely on.
With this solid foundation in place, we removed support for external navigation several months ago, allowing us to focus on a single solution. This significantly simplified our internal architecture and allowed us to consolidate functionality.
Updated public API
Beyond performance gains, we've completely overhauled Hyperview's public API. We've eliminated the need to reach into internal modules and provided a clean, well-organized interface that makes common tasks simpler and more intuitive.
Before:
// Old way - reaching into internalsimport { createProps } from'hyperview/src/services/dom/helpers';
import { renderElement } from'hyperview/src/services/render/index';
import { Parser } from'hyperview/src/services/dom/parser';
After:
// New way - clean public APIimport { createProps, renderElement, Parser } from'hyperview';
What's next?
Developers should update their imports to use the new public API for better TypeScript support. We will be deprecating previous paths in a future release. Check out the updated demo which includes many improvements and bug fixes including a more consistent implementation of safe area examples.
Looking ahead, the cleanup work in this release enables us to move faster on new features and improvements. We're already seeing the benefits internally, with faster development cycles and fewer bugs.
As always, we're here to help if you run into any issues—don't hesitate to reach out with questions or feedback.
Hello Hyperview enthusiasts! We're thrilled to announce the release of Hyperview v0.86.0, packed with enhancements and new features designed to make your development experience even smoother. Whether you're a seasoned developer or just starting with Hyperview, there's something in this update for everyone. Let's dive into the highlights!
Breaking Changes
In this release, we have a notable breaking change: the removal of the share behavior action from the core. This change streamlines our codebase and paves the way for more robust functionality in future updates. The share behavior was moved to the community section of the demo app. If your project relies on this behavior, please make the necessary adjustments to ensure compatibility: copy the share behavior’s code into your app, and make sure it’s registered in the behavior prop of the Hyperview component.
Many Hyperview Demo Improvements
Our demo has received a significant overhaul to improve usability and showcase Hyperview's capabilities more effectively:
Fixes
First, Android functionality has been restored in the Expo app. A previous dependencies update had inadvertently cause a bug preventing the app to render its content properly, and this is now fixed. We made a few UI adjustment to fix improper spacing.
Finally we've removed exceptions in our XML validation - the demo app HXML code is now 100% compliant with the schema!
Community Components
We've invested time in adding some of the custom components we use at Instawork. We've added the BottomTabBar component, which showcases how to hook to the navigation layer while keeping control of the UI with HXML. We've also added our Map/MapMarker components, and a couple other components demonstrating use of client side state and animations: BottomSheet and ProgressBar. All these components can be seen in action in our live demo app.
Welcoming New Contributors
We'd like to extend a warm welcome to our new contributors, @uzyn and @Shaykoo, who have made their first contributions to Hyperview in this release. Thank you for your valuable input and for helping us make Hyperview even better!
Full Changelog
For a detailed list of all changes and updates, please visit our full changelog.
We hope you enjoy the latest version of Hyperview and find these updates beneficial for your projects. As always, your feedback is invaluable to us, so feel free to share your thoughts and suggestions. Happy coding!
The Hyperview demo app was introduced at the same time as the first public release of Hyperview - its goal has always been to showcase the Hyperview functionality through various examples, but it didn’t receive the same attention as the main Hyperview codebase did, in order to scale properly. In particular, the examples code was made of verbose static XML files, that contained a lot of duplication and style inconsistencies. In order to see the examples in action, developers had to clone the Hyperview repository, install the packages, install the mobile runtime of their choice, and run a local server. All of these issues contributed to a less than ideal user and developer experience.
But thanks to some recent development on this project, we can now overcome all these pain points. It is with great excitement that we announce an overhaul of our Hyperview demo app.
Reduced Markup, Increased Readability
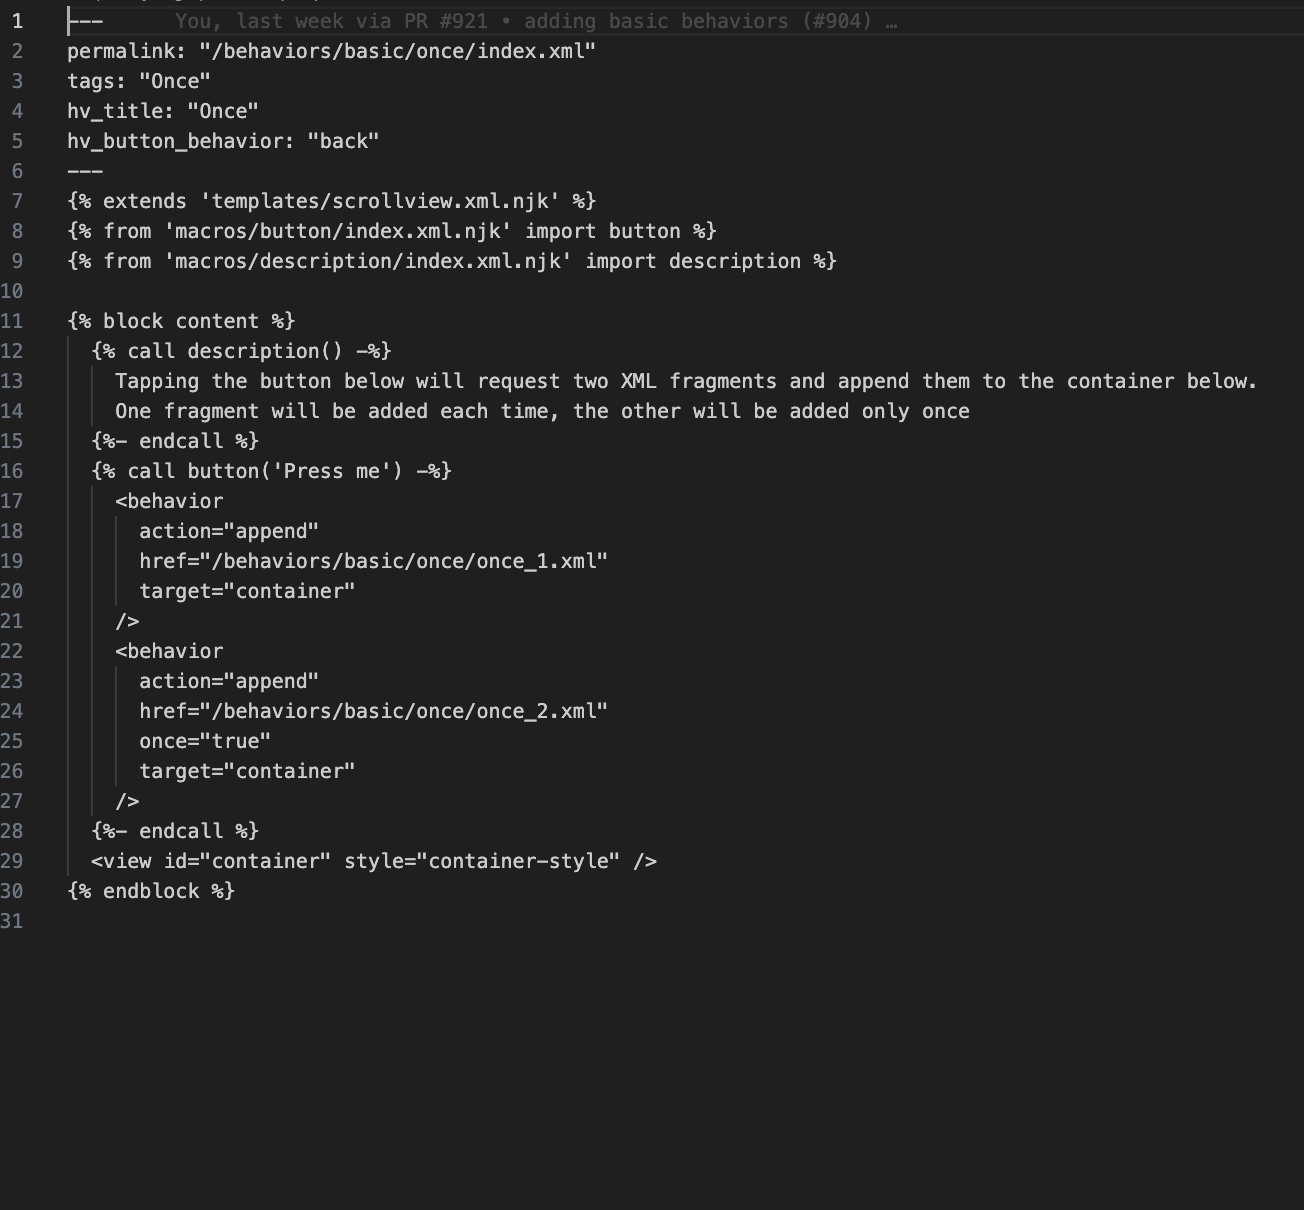
Using nunjuck’s template inheritance, we abstracted away common markup and styles to focus on the content of the screen.
Before
After
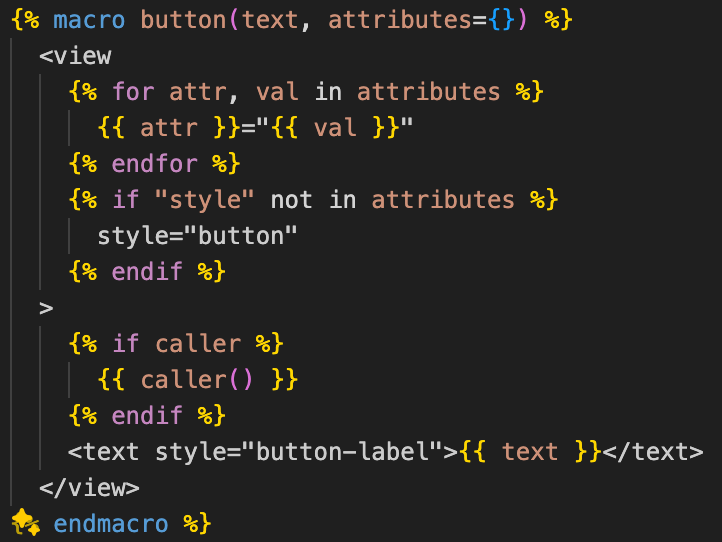
Introduction of Macros
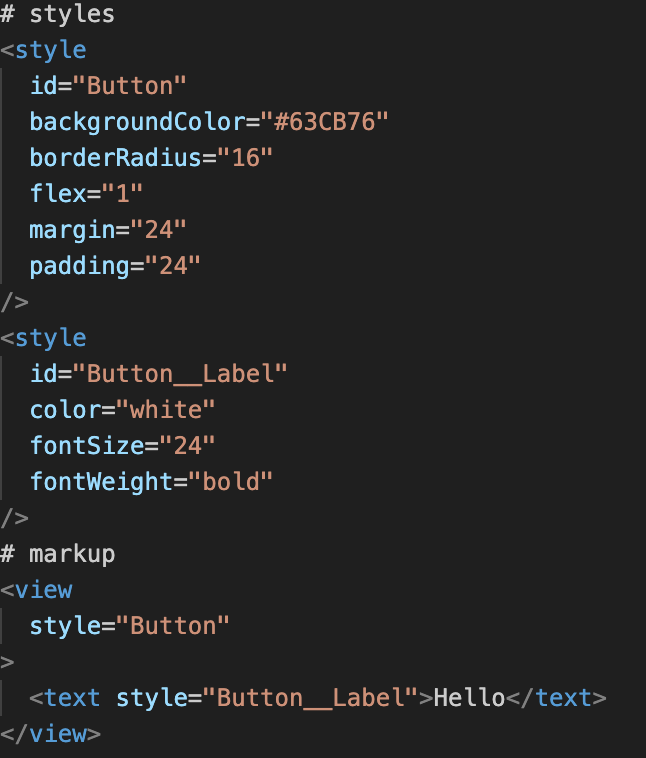
We make use of macros, another functionality of nunjuck templates, to abstract common styles and markup under reusable functions. They helped us reduce the footprint of the XML code throughout the examples. See the example below for the button XML code:
Before
After
+
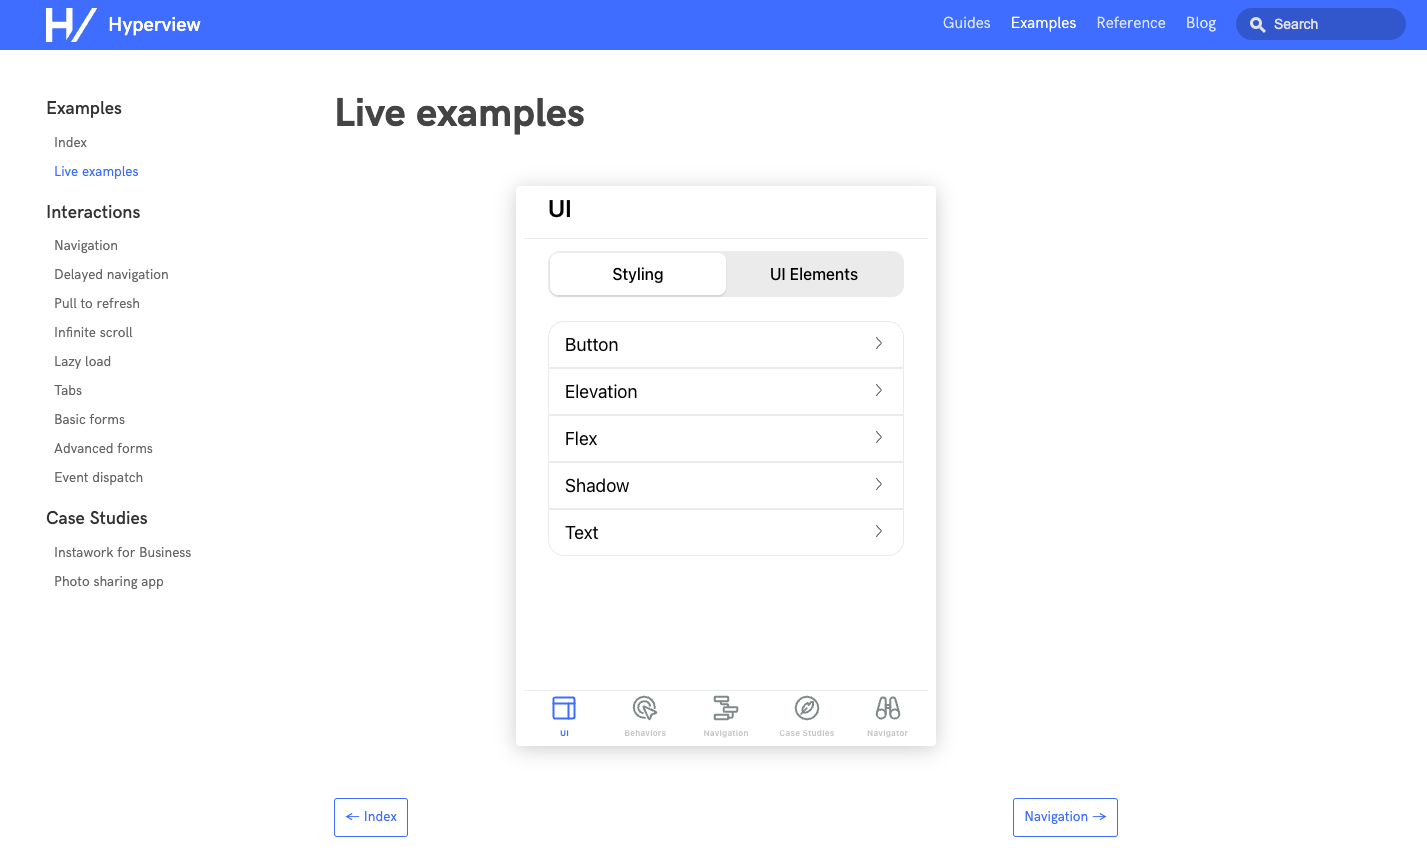
Flattened Hierarchy to Simplify Navigation
We flattened the navigation hierarchy to make it easier to find examples. Prior to this, developers had to navigate through multiple screens just to land at an example. This was made possible by implementing a tab bar layout, and a segmented control layout inside each tab.
Now you are just a tap or two away from reaching the example you wish to refer to.
Before
After
Accessible through your Browser!
A web version of our demo app is just a link away rather than going through the process of installing an application on your phone.
Now save your time by skipping the whole installation process of a mobile app!
Hyperview was designed early on to be extensible; although support for custom elements and behaviors was available from early Hyperview versions, it was never clearly surfaced to our users. We now have a dedicated section in the demo app for community-built components, under the “Advanced” tab. We’d love to showcase your custom component in our demo app! Refer to this guide for rules and practices on getting started with contributing to the demo app.
The 0.81.0 release of Hyperview adds support for providing an optional external log provider. In previous versions of Hyperview, any logging was performed explicitly via console.log, console.warn, or console.error.
With this new functionality, developers are able to pass an alternate provider to allow more control over the logging such as inhibiting logs below a certain severity threshold, saving logs to file, or using third party logging libraries. If no provider is passed into Hyperview, console will be used. Over time we plan to increase the informational logging which Hyperview provides to aid in debugging.
The provider interface is a simplification of the one provided by console:
We have been busily testing and integrating Hyperview's navigation solution over the last few months. While we will continue to add more examples to illustrate more complex concepts, we think it's time for a formal introduction!
We have a few resources which will help you get started:
Our latest blog post gives a high level overview of what navigation is and how we conquered some big challenges to get it integrated into Hyperview
A Navigation Guide dives deeper into the details including some useful examples and best practices
The Hyperview Documentation has been updated with information about <navigator> and <nav-route> elements
The included demo app examples have been updated to show some basic navigation concepts
Please reach out and let us know how Hyperview navigation is working for you!
We recently added an elements management system with events in Hyperview PR #81. This makes it easier to communicate between different Hyperview screens. Thanks to adamstep and flochtililoch for valuable feedback and coming up with the API design.
Problem
Quite often a change in one screen can result in a change in an existing screen in the navigation stack. For example, consider a screen containing user feeds. Clicking on a post in the feeds screen opens a new screen which displays the post. Clicking on "like" should also update the like count in the previous screen which is already pushed on the navigation stack. This is a good use case for using the elements management system.
Spec
This feature introduces a new triggeron-event and a new behavior actiondispatch-event. (Refer to the example for complete XML)
Usage
Consider the following view from dispatch_event.xml rendered on the screen:
<viewaction="append"trigger="on-event"event-name="test-event"scroll="true"href="/advanced_behaviors/dispatch_event/dispatch_event_append.xml"style="Main"><textstyle="Description">Dispatch events to load screens</text><viewstyle="Button"href="/advanced_behaviors/dispatch_event/dispatch_event_source.xml"><textstyle="Button__Label">Open new screen</text></view>
This view will listen for on-event trigger specifically for the event-nametest-event. When this event is caught, it does the append action and appends the XML fragment dispatch_event_append.xml which looks like:
<textxmlns="https://hyperview.org/hyperview">This will get appended with events!</text>
With the press trigger the dispatch-event action will fire an event (internal to hyperview) with the name defined by the event-name attribute.
Extending
on-event and dispatch-event also supports once and delay.
Extending with once
When added to a listener behavior (with trigger="on-event"), the behavior would only respond to the dispatched event once (till the screen is unmounted)
When added to the dispatching behavior (with action="dispatch-event"), the behavior will only dispatch the event once
Extending with delay
When added to a listener behavior (with trigger="on-event"), the behavior would respond to the dispatched event after the specified delay (in milliseconds)
When added to the dispatching behavior (with action="dispatch-event"), the behavior will dispatch the event after the specified delay (in milliseconds)
Examples
Some more examples where events fit in are:
When actions on one screen might affect another screen, for example interacting with an element might update some element in another screen which is beneath the current screen in the navigation stack.
Events can help in decoupling UI elements. A dispatching element doesn't need to know about the receiver element (for example target id). This way, UI elements can be responsive (keep their behaviors nested under the element, rather than in a different place).
Debugging tip
In __DEV__ mode, the console will log the element which captures an event as well as the element which dispatches it.
Please check the behavior attributes docs for more info.
Hyperview v.0.12.2 contains many new features and enhancements since our last update, the biggest one being support for custom behaviors. With support for both custom elements and custom behaviors, the space of possibilities for Hyperview apps is huge!
Hyperview now fully supports custom behaviors. As part of this change, we've removed any behaviors that required external dependencies (phone calls, event tracking, etc). These behaviors were specific to Instawork, so it wasn't appropriate to include them in the core framework.
Behaviors can now trigger a reload action, which mimics the functionality of a refresh button in a browser. This is often useful during development to quickly refresh a single screen in an app.
A new <web-view> element allows embedding web view screens in a Hyperview app.
A new auto-focus attribute on <text-field> allows focusing a field as soon as it renders on screen.
Development Experience
Better logging messages
Based on feedback from Hyperview developers, we added helpful debug logging:
The use of unregistered elements will show a warning in the console.
The use of unregistered behaviors will show a warning in the console.
When a behavior modifies the DOM, the new DOM for the screen gets logged to the console.
Watch mode for demo
Previously, when implementing features in Hyperview, the demo app had to be re-built with every change. There's now a "watch" mode that will automatically propagate changes to the demo app.
Reloading single screens
Behaviors can now trigger a "reload" action, which mimics the functionality of a refresh button in a browser. This is often useful during development to quickly refresh a single screen in an app.
Removal of animation system
Before version 0.12.2, Hyperview had a beta implementation of an animation system. We removed this system to simplify the client, and to lay the groundwork for a fuller animation/gesture system in the future.
Bug fixes
Behaviors are no longer detected solely by the presence of an href attribute. Now, the presence of an href or action attribute will correctly identify
On Android, sending empty multi-part forms no longer causes crashes.
In Part 1 of this series of blog posts, we explored the relative strengths and weaknesses of JSON and XML when representing various data structures. For key-value based data, JSON is the clear winner. But XML beats JSON when it comes to representing tree structures. Since UI layouts are commonly represented as trees, XML is the natural choice for a UI framework like Hyperview.
Another imporant consideration for Hyperview was extensibility. Extensibility matters for a couple of reasons:
We want to keep the core UI elements limited to the bare essentials. But we don't want the framework to be limited to only those core elements. We wouldn't include a map UI element in the core, but it should be possible for developers to add a customed map element to their Hyperview app.
Developers should have the freedom to integrate with services or technologies they already use. Some developers may use Mixpanel for tracking UI events, others may use Amplitude or an in-house system. Hyperview should remain agnostic and support all of these cases.
What's the X for?
XML stands for Extensible Markup Language, so it should come as no surprise that extensibility is built into the lowest level of the spec. The extensibility of XML is based on the idea of using multiple XML "vocabularies" within one XML document. A vocabulary is simply a collection of tags and attributes with a specific meaning. Vocabularies can be formalized with a schema definition and embedded into XML documents via namespaces.
To illustrate how we can embed different vocabularies in the same XML document, let's use the map example from above. Hyperview doesn't come with a way to describe a map, but we can define our own vocabulary:
<map> will represent a specific instance of a map. It takes a few attributes:
latitude: the latitude of the upper left corner of the map
longitude: the longitude of the upper left corner of the map
latitude-delta: the latitudinal length covered by the map
longitude-delta: the longitudinal length covered by the map
<marker> will represent a indicator marker placed on the map. The attributes:
latitude: the latitude of the marker
longitude: the longitude of the marker
Using this new vocabulary, we can describe a map containing two markers:
To embed this map within a Hyperview screen, we need to give the vocabulary a namespace name. The namespace name should be a unique URI, so it's common to use the organization's web domain. For our map vocabulary, we will use https://instawork.com/xml/map. We can now declare the namespace in our Hyperview doc, assign it a prefix, and use that prefix for our elements:
In the <doc> tag, we've added the attribute xmlns:map="https://instawork.com/xml/map". This declares that tags prefixed with "map" belong to the namespace https://instawork.com/xml/map.
Within the <body> tag, we've added our map, but each tag is prefixed with map:.
Note that the Hyperview tags don't require a prefix. That's because the <doc> attribute xmlns="https://hyperview.org/hyperview" declares Hyperview as the default namespace in the doc. Any unprefixed tag will be interpreted as part of the default namespace.
As you can see, namespaces support extensibility by allowing multiple XML vocabularies to co-exist and mix together in one document. APIs that process XML, such as the DOM, have built-in support for searching and querying in a namespace-aware way. This makes it easy to create a framework that can call out to plugins or registered classes when processing tags in a certain namespace.
In fact, that's exactly how custom elements work in Hyperview. Custom elements simply map a namespace and tag name to a React Native component written by the developer. When rendering a screen, if Hyperview comes across a namespaced tag, it looks up the associated component and renders it. Here's the kicker: Hyperview's core UI elements work the same way, there's no need for special handling!
Why reinvent the wheel?
So by design, XML is highly extensible, but what about JSON? Well, there's not much to say since JSON doesn't have any native concept of namespaces or extensibility. Everything is one big nested data structure of arrays and dictionaries. Of course, it's possible to replicate the concept in JSON, maybe with a special $namespace property on an object, or a <namespace>:<prop> convention for objects keys. But JSON libraries would have no awareness that these properties have a semantic meaning, requiring developers to write a lot of special handling for this syntax.
At Instawork, we prefer to stand on the shoulders of giants rather than reinvent the wheel.
So when it came to creating Hyperview, we looked for well-understood, battle-tested tools that matched our needs. With XML, we knew we could evolve and extend the Hyperview spec using the proven technique of XML vocabularies and namespaces. This freed us up to focus on what's new and exciting in Hyperview: the ability to express the UI and interactions of today's mobile apps in a purely declarative way.
Stay tuned for Part 3 in this series, where we'll look at some of the practical & ergonomic reasons we chose XML over JSON for Hyperview's data format.
When demoing Hyperview to new engineers, there's one comment that frequently comes up about the HXML data format:
"XML, really? It's bloated and outdated. Why not use JSON? It's the future."
These comments imply that JSON is the "one true file format" that should be used for everything, but we don't believe there's such a thing. Each format makes tradeoffs in encoding, flexibility, and expressiveness to best suit a specific use case.
A format optimized for size will use a binary encoding that won't be human-readable.
A format optimized for extensibility will take longer to decode than a format designed for a narrow use case.
A format designed for flat data (like CSV) will struggle to represent nested data.
In addition to the intrinsic properties of a format, external factors can influence its practical use cases, such as the popularity of the format among the target developers, or library support in the desired programming languages.
When choosing a file format to use in a software project, software engineers pick the one with the best balance of features and external factors for the situation. This post is the first in a 3-part series examining the decision process we used to choose XML over JSON as the format at the core of Hyperview. In part 1, we focus on the suitability of each format for defining user interfaces.
JSON for lists, XML for trees
Both XML and JSON can represent complex nested data structures, but they excel at different types of structures. JSON's origins as a subset of JavaScript can be seen with how easily it represents key/value object data. XML, on the other hand, optimizes for document tree structures, by cleanly separating node data (attributes) from child data (elements).
We can illustrate the advantages and disadvantages of each format by using both formats to represent two types of data: lists and trees.
Example 1: List of users
Let's represent a list of users. Each user has a first and last name, and a list of favorite movies. In JSON, there's a sensible way to model this data: as an array of objects with keys for the user properties:
A particular strength of JSON is its support for nested data structures. Notice that the list of movies can be easily represented using an array value for the favorite_movies key. In XML, however, element attributes must be strings. This means there's no officially supported way to represent the list of movies in an element attribute. We can hack this by encoding the list into an attribute using a comma delimiter:
This solution is not ideal. We're not using XML semantics to represent the list of movies, meaning we can't rely on XML syntax validation to verify the data. The clients reading the data will need to know how to split on commas and unescape the data in this particular attribtue. So both writing and reading the data is error-prone. To address these shortcomings, we should use XML syntax to represent the list of movies. This means creating child elements for each movie:
With this approach, we avoid the hack of using a comma delimiter in an attribute. However, we've created another problem in the form of inconsistency: some user properties are represented as element attributes, others as child elements. The client has to know to look in both places to get all of the user's data. To be consistent, we can represent all user properties as child elements:
Now we have a consistent, extensible representation for a list of users in XML. But compared to the same data in JSON, this representation is overly verbose and hard to write. The XML syntax obscures the structure of the data.
So JSON is well-suited for representing lists of objects with complex properties. JSON's key/value object syntax makes it easy. By contrast, XML's attribute syntax only works for simple data types. Using child elements to represent complex properties can lead to inconsistencies or unnecessary verbosity.
Example 2: Org Chart
XML may not be ideal to represent generic data structures, but it excels at representing one particular structure: the tree. By separating node data (attributes) from parent/child relationships, the tree structure of the data shines through, and the code to process the data can be quite elegant.
A classic example of a tree structure is a company org chart. Let's assume each node in the tree is an employee, with a name and title. The edges in the tree represent a reporting relationship. The root of the tree is the boss.
In JSON, we represent each employee as an object with key/value pairs for the name and title. But JSON doesn't provide a separate notation for relationships vs attributes, so we must also use a key/value pair to represent an employee's direct reports:
Notice that it's hard to distinguish a node's properties from the relationships. It's common to prefix the relationship keys with "$" or "_" to make the distinction clearer, but this is a hack akin to using a delimiter in an XML attribute. When writing the JSON, we can cause errors by forgetting the prefix. Likewise when reading the JSON, we can't loop through the keys in an object without remembering to filter out the ones starting with the prefix. Both reading and writing the data is now error-prone and inelegant.
XML really shines when it comes to tree data: elements are nodes, attributes are node properties, and child elements imply the reporting relationship:
Compared to the JSON example, it's much easier to get a sense of the underlying structure of the data.
Attributes of the employee (name and title) are cleanly separated from the employee relationships. The relationships are both easier to visualize when writing the file, and the code to read the data can operate on the overall structure without touching node properties. There's no chance of accidentally interpreting the relationship data as an employee attribute like in the JSON example.
The advantages of XML over JSON for trees becomes more pronounced when we introduce different node types. Assume we wanted to introduce departments into the org chart above. In XML, we can just use an element with a new tag name:
Now it's JSON's turn to be bloated and hard-to-read. Meanwhile, the XML version represents the tree data succinctly without obscuring the underlying structure.
These two examples highlight the relative strengths and weaknesses of JSON and XML when representing different types of data:
JSON excels at representing a collection of homogenous objects, where object properties can be composite data types
XML excels at representing trees with heterogeneous objects, where object properties are simple data types
UI Layouts are trees
Hyperview's goal is to bring a web-like development experience to mobile:
On the web, a server responds to an HTTP request with HTML/CSS to render a web page.
In Hyperview, a server responds to an HTTP request with a response to render a mobile app screen.
In order to fill the role of HTML/CSS for mobile apps, Hyperview's file format must be able to define the layout and structure of an app screen's UI.
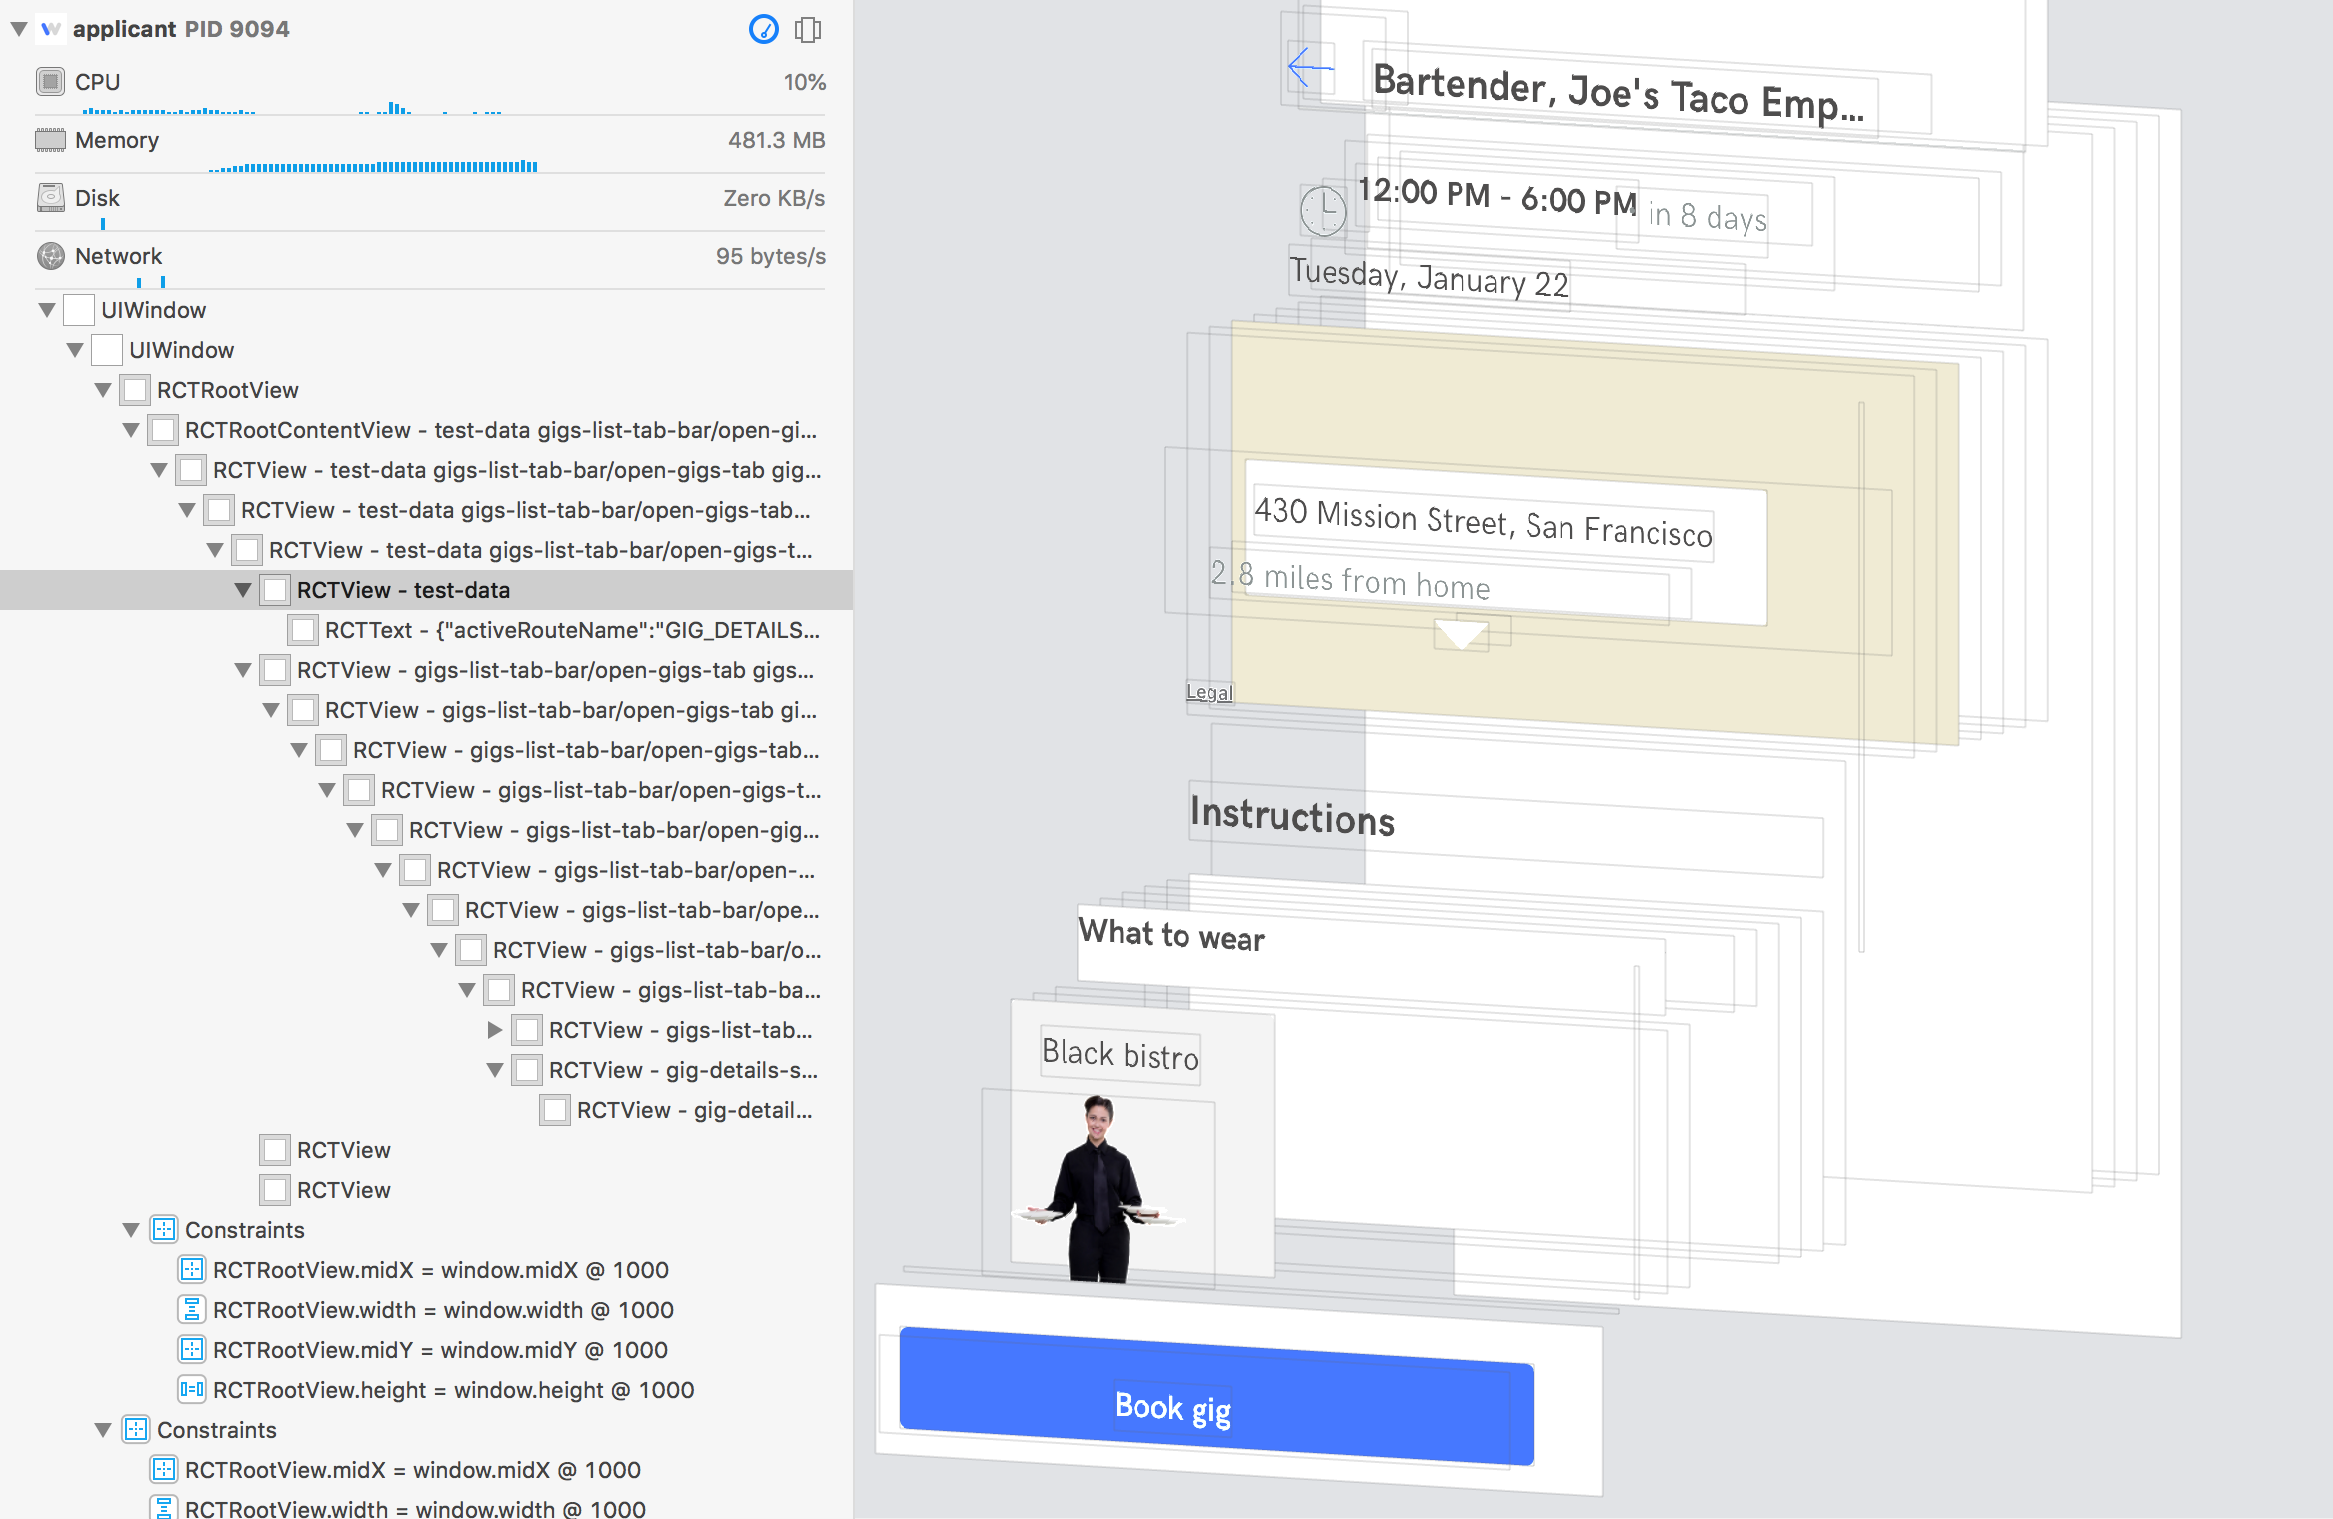
And component trees are the best way to represent UI layouts. Every major UI framework out there uses a component tree. Xcode even offers an exploded 3D view that really highlights the underlying tree structure of a screen: each component has a parent component, and everything rolls up to a shared root component.
Trees are a powerful representation for UI layouts. They naturally provide component groupings, allowing designers and developers to use higher-level abstractions. When we need to hide, show, or animate a section of the screen, we don't need to change the state of each component in the section. Rather, we can change the state of the single parent component that contains every UI element of the section. When modifying a component, we only need to worry about what's in its subtree, and not what's happening at higher levels.
XML for UI Layouts
UI layouts are represented as component trees. And XML is ideal for representing tree structures. It's a match made in heaven! In fact, the most popular UI frameworks in the world (HTML and Android) use XML syntax to define layouts. Still not convinced? Take a look at React, the popular JS library designed around composing UI components. If there was ever a library to embrace JSON for defining UI, it should be React, right? But the React website actually recommends defining component UI using JSX, an XML-like format. Even though using JSX requires learning a new non-JS syntax and adding a transpiling step to the build process, the library authors feel it's worth the pain in order to use XML!
As noted at the beginning, each data format comes with certain tradeoffs. Overall, the benefits of XML for Hyperview outweigh the downsides, we still need to handle those rough spots. In particular, we noted that XML element attributes cannot natively represent lists of data. This case occurs in Hyperview with how we apply styles to elements. Due to this limitation of XML, styles are represented as space-separated ids, and the ids cannot contain spaces. Luckily, this limitation matches the behavior of the class attribute in HTML, so the approach is at least familiar to web developers.
Stay tuned for parts 2 and 3 of our exploration of XML and JSON in the context of Hyperview. Part 2 will cover the extensibility of JSON and XML, while Part 3 will compare the developer experience of both formats.
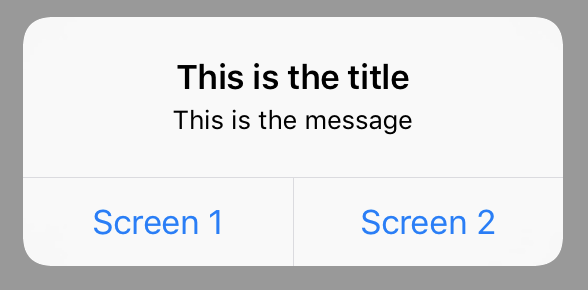
Today we released Hyperview v0.7.0. This version includes one new feature: the ability to trigger native system alerts on iOS and Android.
Here's the HXML to render the alert above:
<behaviorxmlns:alert="https://hyperview.org/hyperview-alert"trigger="longPress"action="alert"alert:title="This is the title"alert:message="This is the message"
><alert:optionalert:label="Screen 1"href="/screen1"action="push"
/><alert:optionalert:label="Screen 2"href="/screen2"action="new"
/></behavior>
Alerts are triggered using the standard behavior syntax. This means any Hyperview trigger can cause an alert to appear: press, longpress, load, refresh, etc. You could even trigger an alert on visible, but I wouldn't recommend it as a good user experience.
To prevent name clashes, the new attributes and elements use a namespace: https://hyperview.org/hyperview-alert. I find it's nice to define the namespace on the <behavior> that will show the alert (see the example above), rather than at the root of the doc. This will likely be a common pattern for new elements added to Hyperview.
The child <alert:option> elements define the available options on the alert. The options contain standard Hyperview behaviors that trigger on press. This means alert options can do things like navigate screens, update parts of the page, or execute custome behaviors.
Use cases
System alerts open up many new use cases in Hyperview, some common ones are explained below.
Confirmation before performing an action
Before performing a destructive action, like a DELETE request to the server, it can be a good idea to get confirmation from the user. To do the confirmation with a system alert, wrap the destructive behavior in an alert with a "Confirm" and "Cancel" option. The destructive behavior should be triggered when the user presses "Confirm". No behaviors need to be associated with the "Cancel" option, which will dismiss the alert.
<viewstyle="Button"><behaviorxmlns:alert="https://hyperview.org/hyperview-alert"action="alert"alert:title="Delete business?"alert:message="All job posts at this location will be permanently deleted."
><alert:optionalert:label="Delete"
><behaviorverb="DELETE"href="/businesses/123"action="replace"target="Main"
/></alert:option><alert:optionalert:label="Cancel"
/></behavior><textstyle="Button__Text">
Delete
</text></view>
Status after performing an action
After performing a server-side action, alerts can be used to convey the status of the result. For example, if there's a problem validating the data or other server-side error, the response can include a behavior triggered on load that displays an alert with the error message. No alert options need to be provided, the system will have a default dismiss button.
It's best not to overuse alerts for statuses, since they require user interaction to dismiss. For less important status updates, such as positive confirmation, consider using a non-blocking toast or inline feedback.
<viewstyle="Main"><behaviorxmlns:alert="https://hyperview.org/hyperview-alert"trigger="load"action="alert"alert:title="Something went wrong"alert:message="The business could not be deleted. Please try again later."
/></view>
Show extra options for user actions
Sometimes a user action may have unclear intent. For example, when deleting a recurring event in a calendar app, it's unclear if the user means to delete just the event on one day, or all future events as well. In situations like this, an alert with the two options can disambiguate the user's intent. When using an alert for disambiguation, providing a "Cancel" option is a good ideas as well.
<viewstyle="Button"><behaviorxmlns:alert="https://hyperview.org/hyperview-alert"action="alert"alert:title="Delete future events?"alert:message="Do you want to delete all future events as well?"
><alert:optionalert:label="Delete single event"
><behaviorverb="DELETE"href="/events/123"action="replace"target="Main"
/></alert:option><alert:optionalert:label="Delete all future event"
><behaviorverb="DELETE"href="/events/123?delete_future=true"action="replace"target="Main"
/></alert:option><alert:optionalert:label="Cancel"
/></behavior><textstyle="Button__Text">
Delete
</text></view>
Next steps
Check out the full documentation of alerts on the reference page. You can also play around with examples in the demo app or see the HXML samples in the Github repo.
The implementation of alerts demonstrates how behaviors can do more than navigations or screen updates, and how chaining behaviors together opens up new interaction possibilities. The pattern used for alerts will be used for other upcoming features, such as:
system permission dialogs
action sheets
prompts
Look for support for these behaviors in an upcoming release! Follow @hyperview_org on Twitter to hear about the latest news.