Event dispatch
By using trigger on-event and the behavior action dispatch-event, we can communicate between different hyperview screens or between elements in the same screen.
Consider a screen which shows a list of contacts along with a status. Another screen shows the details of a single person with an option add them to your network. Every time a person is added, we want the list on the first screen to show the updated status.
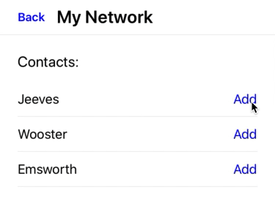
Let's start with the markup for the list of people and the default status. Clicking on an item will open a new screen with the person's information.
List Screen
<doc xmlns="https://hyperview.org/hyperview">
  <screen>
    <body style="Main">
      <list>
        <item key="1" style="Item" href="/item1">
            <text style="Item__Label">Jeeves</text>
            <text style="Item__Add">Add</text>
        </item>
        <item key="2" style="Item" href="/item2">
            <text style="Item__Label">Wooster</text>
            <text style="Item__Add">Add</text>
        </item>
        <item key="3" style="Item" href="/item3">
            <text style="Item__Label">Emsworth</text>
            <text style="Item__Add">Add</text>
        </item>
      </list>
    </body>
  </screen>
</doc>
Info Screen
<doc xmlns="https://hyperview.org/hyperview">
  <screen>
    <body style="Main">
      <view scroll="true" style="Main">
        <text style="Name">Jeeves</text>
        <text style="Phone">Ph: (555) 555 5555</text>
        <view style="Button">
          <text style="Button__Label">Add to network</text>
        </view>
      </view>
    </body>
  </screen>
</doc>
The result:
Using dispatch-event behavior action, we emit an event (internal to hyperview) when a contact is added on the Info Screen. We give this event a name via the event-name attribute so that listeners can act on this specific event.
Info Screen
<doc xmlns="https://hyperview.org/hyperview">
  <screen>
    <body style="Main">
      <view scroll="true" style="Main">
        <text style="Name">Jeeves</text>
        <text style="Phone">Ph: (555) 555 5555</text>
        <view style="Button">
          <behavior
            action="dispatch-event"
            event-name="added-item1"
            trigger="press"
          />
          <text style="Button__Label">Add to network</text>
        </view>
      </view>
    </body>
  </screen>
</doc>
Next, we add listeners for the above events on the List Screen. The status text elements will listen for the on-event trigger specifically for the corresponding event-name in each of the Info screens.
Also create an XML fragment with the updated status, which will replace the default status.
Updated Status Fragment
<view xmlns="https://hyperview.org/hyperview">
  <text style="Item__Added">Added</text>
</view>
List Screen
<doc xmlns="https://hyperview.org/hyperview">
  <screen>
    <body style="Main">
      <list>
        <item key="1" style="Item" href="/item1">
            <text style="Item__Label">Jeeves</text>
            <text
            action="replace"
            event-name="added-item1"
            trigger="on-event"
            href="/_added.xml"
          >
            <text style="Item__Add">Add</text>
            </text>
        </item>
        <item key="2" style="Item" href="/item2">
            <text style="Item__Label">Wooster</text>
            <view
            action="replace"
            event-name="added-item2"
            trigger="on-event"
            href="/_added.xml"
          >
            <text style="Item__Add">Add</text>
            </view>
        </item>
        <item key="3" style="Item" href="/item3">
            <text style="Item__Label">Emsworth</text>
            <view
            action="replace"
            event-name="added-item3"
            trigger="on-event"
            href="/_added.xml"
          >
            <text style="Item__Add">Add</text>
            </view>
        </item>
      </list>
    </body>
  </screen>
</doc>
Adding a contact dispatches an added-item* event which triggers the listener to replace the status with the fetched fragment. When we go back, we can see the updated status.
We can dispatch multiple events which can trigger different actions. Extending the above example, lets say we want to go back to the previous screen when a contact is added.
We do this by dispatching another event go-back when the add button is pressed. When caught, it will navigate back to the previous screen.
Info Screen
<doc xmlns="https://hyperview.org/hyperview">
  <screen>
    <header style="Header">
      <behavior action="back" trigger="on-event" event-name="go-back" />
    </header>
    <body style="Main">
      <view scroll="true" style="Main">
        <text style="Name">Jeeves</text>
        <text style="Phone">Ph: (555) 555 5555</text>
        <view style="Button">
          <behavior
            action="dispatch-event"
            event-name="added-item1"
            trigger="press"
          />
          <behavior
            action="dispatch-event"
            event-name="go-back"
            trigger="press"
          />
          <text style="Button__Label">Add to network</text>
        </view>
      </view>
    </body>
  </screen>
</doc>
Note: We can also have multiple listeners for the same event. In the above example, we could trigger the back action on the added-item1 event itself.